


Armortek M26 Pershing Build
 05-07-2023, 06:08 PM
#26

WOW! That Loctite 480 dries VERY QUICKLEY!!!
Did a few of the wheels/bogies, this is going to take a while as you have about one seconds to place the tire on the wheel before the glue starts to set. I place a small bead around the rim then grab the rubber tire, said a hail Mary, than force it on as quick as I can. Yup, as posted on the Armortek forums my fingers are covered in black. There has to be a better way???
Mike, I have all those books and they will help a lot. I want a WWII Zebra mission tank so from photos of the period I need the periscopes you're removing. LOL
Looks like I need some periscopes and periscope guards.
This is going to be an awesome tank when done, can't wait for the options packs!
 05-08-2023, 02:32 AM
#27

Thread Starter
Good Morning Nick!
I've always used that JB Weld Super Glue but, like your's, it sets up INSTANTLY. I used it on the return roller tires and there was NO time to adjust'em. And ya got to watch it if it gets on your fingers.
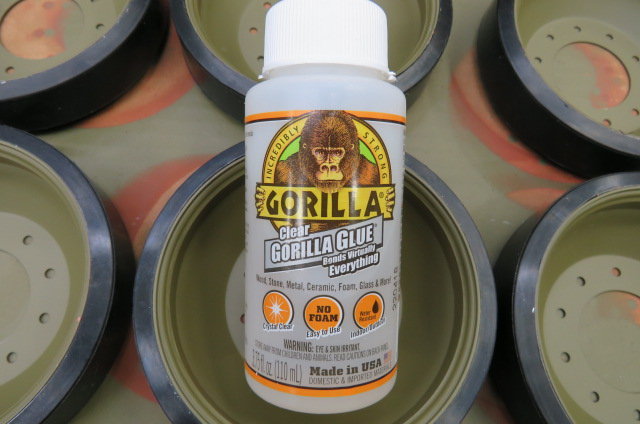
I was not looking forward to using that Super Glue on the roadwheels when my wife said I should try the Gorilla Glue she uses. I was skeptical thinking 'AWW, that stuff won't be worth anything'. But I needed something so I used it.
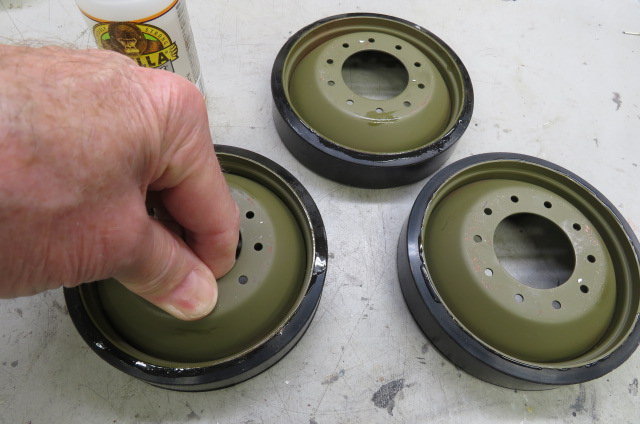
So yesterday at noon I smeared two lines of this Gorilla Glue on each bead then started the tire on from the back, pushing down on the rim until they went in flush on the front. I left'em all face down on a flat surface (counter top & big piece of cardboard). Any glue that came out the back I kinda wiped off and left'em all on their faces until last night. This Gorilla Glue has about two hours of working time so easy to mess with and it takes 24 hours before fully set.
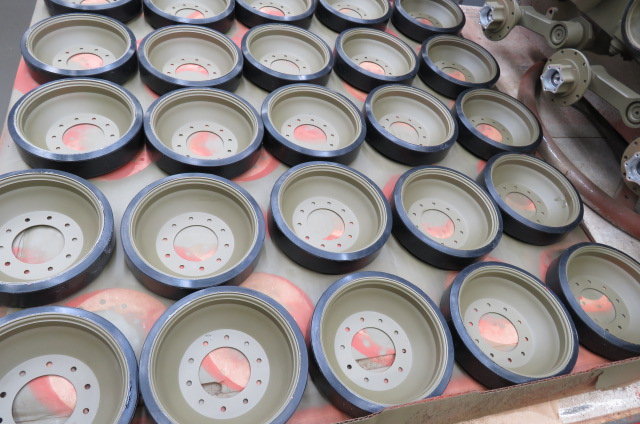
Right before bed I went out to check'em and turn'em over. The glue had set up good but still a little tacky. This morning I went out and those tires are ON TIGHT! I pushed the tires HARD sideways with my thumbs and no tire moved. All the faces are clean and any left on the back of the tire rubber will wear off quickly with driving use.
AND I only used 1/4 of the bottle on all these tires! Heck, if I would have known that I would have REALLY filled up the center valleys on the rims with glue!
I'm so glad my wife got me to use it because I AM IMPRESSED with this Gorilla Glue! I'll see how it holds up when I get this tank going but this beats epoxy and instant glue in my opinion (so far).
I've always used that JB Weld Super Glue but, like your's, it sets up INSTANTLY. I used it on the return roller tires and there was NO time to adjust'em. And ya got to watch it if it gets on your fingers.
I was not looking forward to using that Super Glue on the roadwheels when my wife said I should try the Gorilla Glue she uses. I was skeptical thinking 'AWW, that stuff won't be worth anything'. But I needed something so I used it.
So yesterday at noon I smeared two lines of this Gorilla Glue on each bead then started the tire on from the back, pushing down on the rim until they went in flush on the front. I left'em all face down on a flat surface (counter top & big piece of cardboard). Any glue that came out the back I kinda wiped off and left'em all on their faces until last night. This Gorilla Glue has about two hours of working time so easy to mess with and it takes 24 hours before fully set.
Right before bed I went out to check'em and turn'em over. The glue had set up good but still a little tacky. This morning I went out and those tires are ON TIGHT! I pushed the tires HARD sideways with my thumbs and no tire moved. All the faces are clean and any left on the back of the tire rubber will wear off quickly with driving use.
AND I only used 1/4 of the bottle on all these tires! Heck, if I would have known that I would have REALLY filled up the center valleys on the rims with glue!
I'm so glad my wife got me to use it because I AM IMPRESSED with this Gorilla Glue! I'll see how it holds up when I get this tank going but this beats epoxy and instant glue in my opinion (so far).
Last edited by Old MSgt; 05-08-2023 at 02:50 AM.
05-08-2023, 10:14 AM
#28
Good info on gorilla glue. The Loctite 480 holds well, but is such a pain/mess to work with (on tires). I worked out a decent process, but it still runs all over.
Loving these Pershing builds!
Keep at it boys!
Bob
Loving these Pershing builds!
Keep at it boys!
Bob
05-08-2023, 01:03 PM
#29
Thread Starter
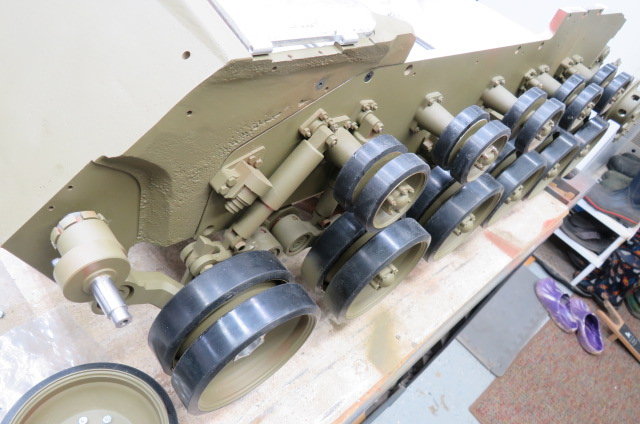
Last hubcap! Today I bolted the wheels on the hubs and after I started the outside nuts on I used my Dewalt drill like an impact wrench to run the bolts in from the back.
I was just about to start to put the inside shaft keeper screws/washers on and remembered I hadn't done the shocks. So I did them (which took a while). Finally did the shaft screws and after a break to let my hands recover, I started on the hubs.
Yeah Bob, this Gorilla Glue is easy to work with but we'll see how it holds up running. If it don't I'll be shooting JB Weld Super Glue IN the loose ones!
My hands are worn out... (but more things done!)
05-09-2023, 03:31 PM
#30
Just finished gluing the tires on the wheels. I got smart and used vinyl gloves, made sure they were tight fitting. So the Loctite 480 still got everywhere except on my skin (fingers). Doesn't look good when you go to prep dinner and your fingers are stained black! I hope to have all the bogies installed by the weekend.
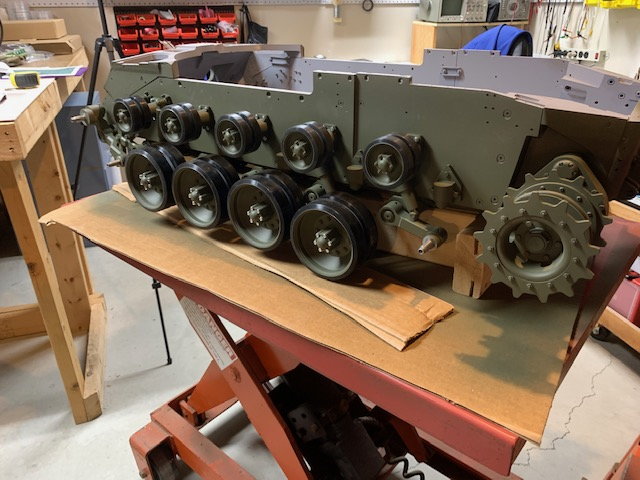
Finally getting the bogies on.
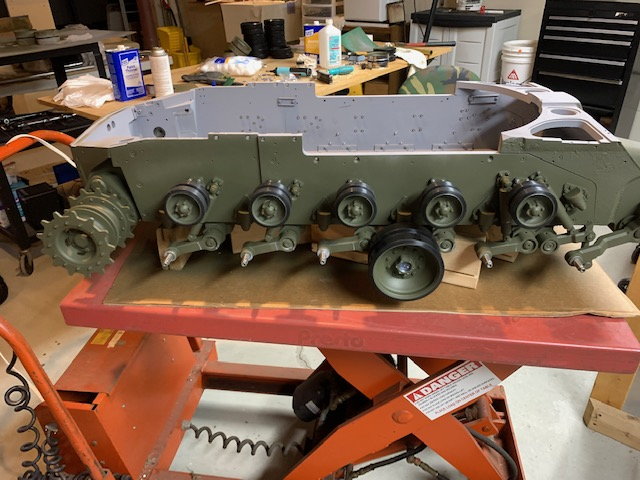
Thank God for the lift!
Finally getting the bogies on.
Thank God for the lift!
05-13-2023, 07:58 AM
#32
Thread Starter
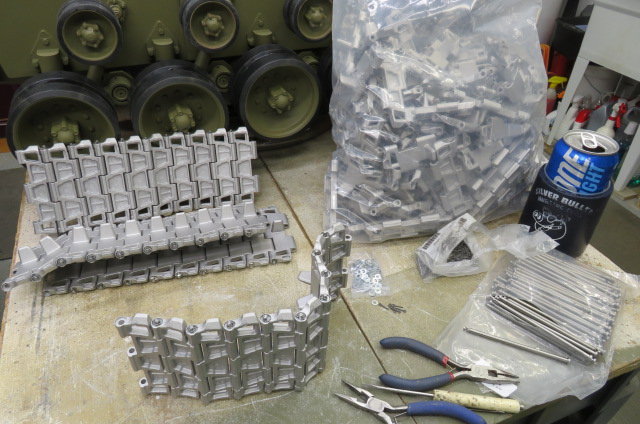
I got 40 together so far but only do a couple links at a time cause bending those cotter pins make my old hands start bothering me. Only 120 more to go (over a couple weeks...)!
05-13-2023, 08:52 AM
#33
with one of the guys when we were prepping the hydraulic system to get our main flight deck elevator operational. I was just wanting to go along to observe the process. To get down to this area required climbing down two decks down a series of rungs welded to the internal hull walls; no railing, no safety effects of anykind and it was a straight drop more than three levels. I thought 'if your hands lock up while you're on that thing it could get ugly'. Long story short I have yet to travel down there....
When we're young bucks we don't give things like hands a second thought and the 'old farts' griping about their hands; 'ah they're just grumpy old men'. Well time catches up to all of us...
I think part of the reason I've moved on from 1/16 and to a degree even 1/10 is that everything being a little larger makes it easier to hold. Then we've got the other end of the spectrum- they're heavier than most any of us can move on our own once built...can't win fur tryin'.....
Jerry
The following users liked this post:
Old MSgt (05-13-2023)
05-13-2023, 10:59 PM
#34
I just had to put together a full set of tracks for my 1/16 Hellcat and 1/16 Comet so I can sympathize with the monotony of track assembly. Like Jerry, I have a few issues with my left hand cramping up holding small parts. Sucks getting old, but putting together tracks on my own big Pershing would be a task I'd like to undertake.
05-14-2023, 01:53 PM
#35
Mike, are you going to paint the tracks or leave them as is and naturally weather? I'm planning on leaving them as is.
Got all the wheels on but need to paint all the screw heads, maybe tomorrow. I need to make a template to shield everything but the hubs with the screw heads so I can spray paint.
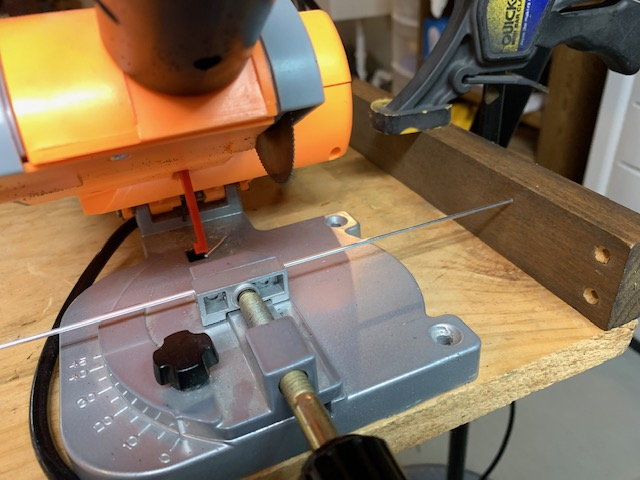
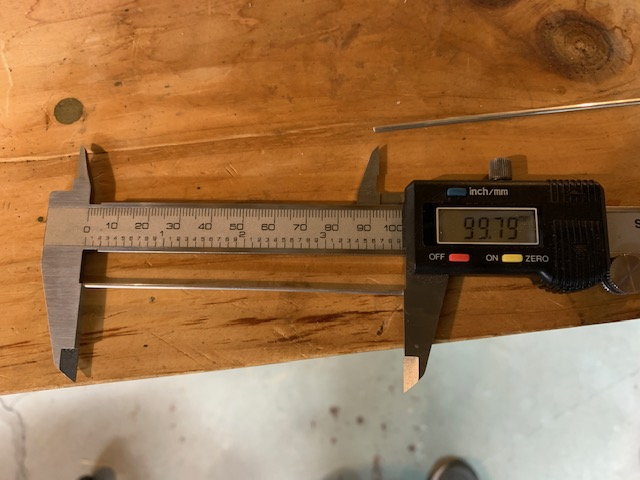
I did move on to the grills, it looked a bit intimidating having to cut several aluminum rods to 112mm and 100mm lengths for the grills. So I took my cheapo hobby chop saw and set up a stop at 100mm on one of my benches. Worked out pretty good. I should be able to cut alll the rods to the right length consistently so the griles will look good. Although John's aftermarket grills at ECA look pretty good. When he gets them on his sight I'll have to see how much, they will look nicer.

Got all the wheels on but need to paint all the screw heads, maybe tomorrow. I need to make a template to shield everything but the hubs with the screw heads so I can spray paint.
I did move on to the grills, it looked a bit intimidating having to cut several aluminum rods to 112mm and 100mm lengths for the grills. So I took my cheapo hobby chop saw and set up a stop at 100mm on one of my benches. Worked out pretty good. I should be able to cut alll the rods to the right length consistently so the griles will look good. Although John's aftermarket grills at ECA look pretty good. When he gets them on his sight I'll have to see how much, they will look nicer.
05-14-2023, 04:16 PM
#36
Thread Starter
Hi Nick! I always take the tracks out and lop'em over a sawhorse and just spray'em the same color (no primer) as the tank. That way the paint wears off the high spots and under the roadwheels (sand, dirt, possums, etc.) and track horns naturally. It don't take long and looks good.
After I got the wheels on with the hull still off it's wheels I just spun each wheel fast and gave it a quick shot of paint. That covered the wheel and hub nuts. Very little got on the rubber tires and what did I used a paper towel with a little paint thinner, rotated the wheel slowly and rubbed any paint off. Quick and easy.
Yeah, I'm DREADING the deck hatches. The 'old' AT Shermans had cast (pot metal) grills that were pretty good. Johns' (ECA) grills look really nice but don't know the price and how they'll fit the AT holes. IF I go to make the hatches like you I'm just going to use JB Weld on the ends and cross members and HOPE I cut the slats correctly. That job will be one of the last things I do and'll probably mess'em up. I like the pictures of how you are making'em!
05-16-2023, 10:05 AM
#37
Thread Starter
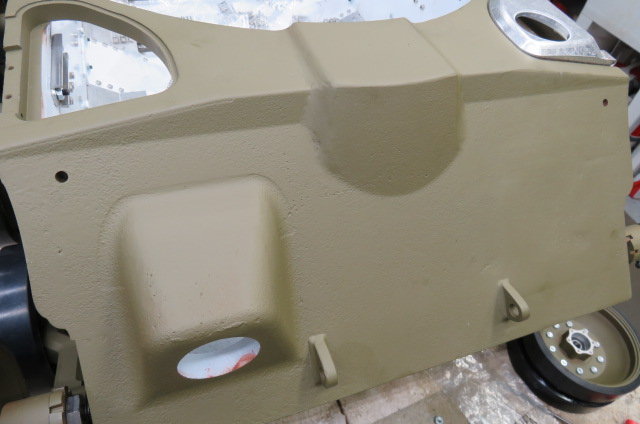
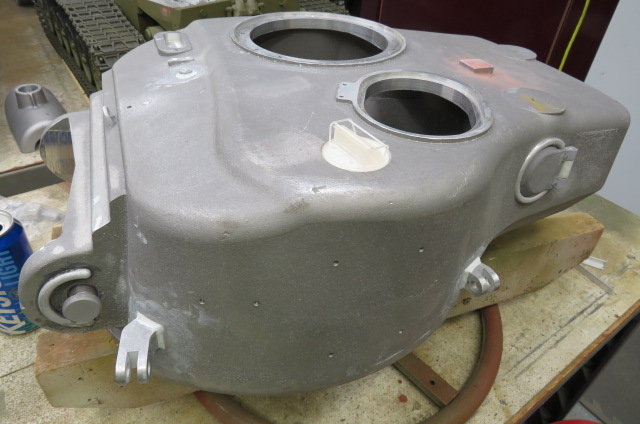
I never claimed to be an 'auto body man' but yesterday I figured I'd smoothed Milliput/Bondo enough so I primed & painted the front of the hull. I'm kinda glad I sealed the two inside periscope locations cause it now looks 'right'. Also did a lot of sanding to get rid of the rough cast finish cause the Pershings I've seen first hand in museums are pretty smooth.
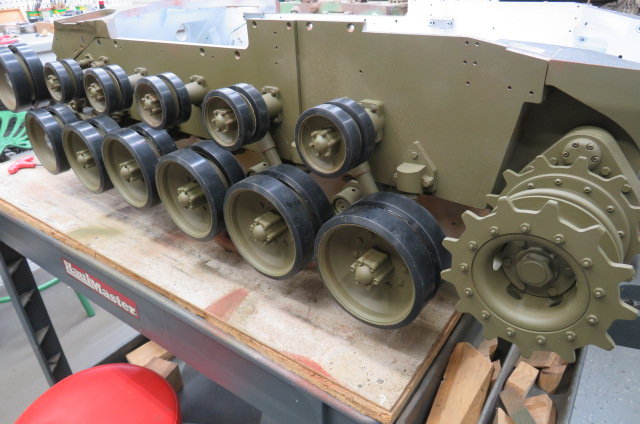
This morning I bolted it on and then installed the idler suspenions. Got the drive sprockets on to get'em out of my way on the cart lower shelf.
I have to wait to bolt the front idler wheel hubs on until I get the fenders mounted so I'll work on them and get'em painted soon. After that I'll start working on the fender tool boxes which need to have the corners tweeked and their seams filled in. Just an update...
Last edited by Old MSgt; 05-16-2023 at 10:07 AM.
05-17-2023, 05:07 PM
#38
Looks good, I like the welds on the tow hooks.
I'm still working on the grills. After the rods are cut to size I put a little green Loctite in the slats then pushed the rods down into the recesses until it "snapped". I used the back end of a blunt tool so as not to mark them, they are aluminum so will easily scratch. The countersunk screws that are on the sides of the grills stick out too much, the instructions mention this and they have to be ground down. I used a counter bore bit to increase the countersink a bit then ground the top of the screw on the belt sander. Milliput for the welds where the rods attach to the frame and hinges.
There are a lot of rods to cut to size!
That countersunk screw sticks out too much, it has to be ground or sanded down.
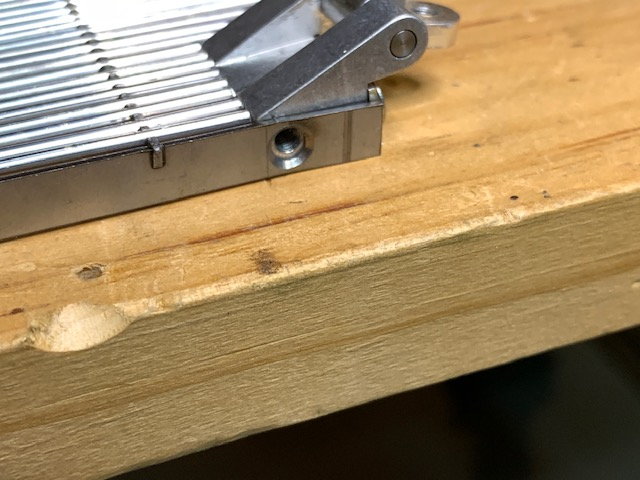
I hit the hole with a countersink bit so the screw would go in a little more before I saned them flush. This is before.
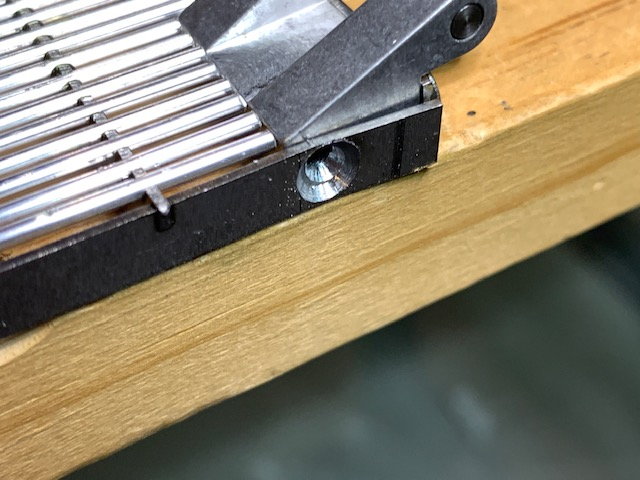
This is after, not much material left for the screw to grab.
Milliput welds, they should look better when primed and painted, I hope!
I'm still working on the grills. After the rods are cut to size I put a little green Loctite in the slats then pushed the rods down into the recesses until it "snapped". I used the back end of a blunt tool so as not to mark them, they are aluminum so will easily scratch. The countersunk screws that are on the sides of the grills stick out too much, the instructions mention this and they have to be ground down. I used a counter bore bit to increase the countersink a bit then ground the top of the screw on the belt sander. Milliput for the welds where the rods attach to the frame and hinges.
There are a lot of rods to cut to size!
That countersunk screw sticks out too much, it has to be ground or sanded down.
I hit the hole with a countersink bit so the screw would go in a little more before I saned them flush. This is before.
This is after, not much material left for the screw to grab.
Milliput welds, they should look better when primed and painted, I hope!
The following users liked this post:
Old MSgt (05-18-2023)
05-18-2023, 02:29 AM
#39
Thread Starter
They look PERFECT Nick! I'll try to get these together soon but don't know how they'll turn out. I'll have to figure out the best way to cut'em cause that's a challenge by alone.
Yesterday morning I went out to make a couple more track links of ten but just kept going and got all 124 more done (82 links per track side). After the first two sections (10) were done using two needle nose pliers I said 'BULLSH... poot on THIS!', I have to figure out a better way. So after the cotter pin was in I held the eye with pliers and used a tiny aluminum tube to hook on each side of the pin and bend'em around. Then used another plier to finish pinching'em around together. Sped production UP a LOT! Still took me over two hours and my old hands were sore but that mind numbing task is done!
Took'em out, threw'em over a sawhorse and painted'em. I didn't use the same tank paint cause I didn't want to run short but I had lots of other spray cans of OD and used one of them. It's a tad shade darker but'll wear off in the high areas quick and be darker in the pits.
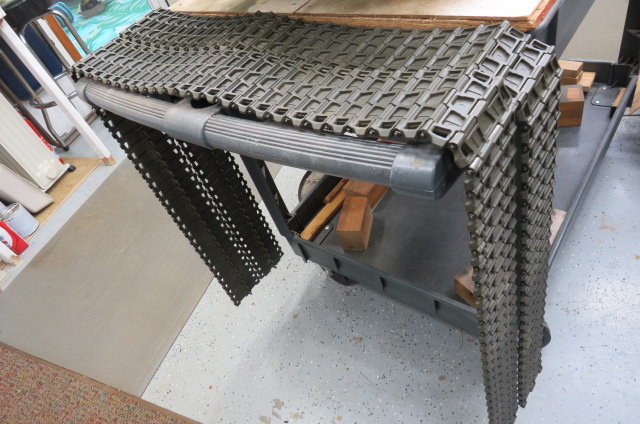
05-18-2023, 03:14 AM
#40
If you have a Dremel and a 3D printer, you can cut the slats with a Dremel chop saw.
I printed one of these for my Dremel and it works pretty well: https://www.thingiverse.com/thing:4950836
Or you can get a small hobby chop saw like seen earlier in the thread at Harbor Freight: https://www.harborfreight.com/2-in-m...saw-62136.html
I have one of those and it works well if you go slow with it. Definitely not perfect, but what do you expect for $40.
05-18-2023, 04:24 AM
#41
Thread Starter
Thanks Nick & Tankme!! I'll hit Harbor Freight and get one of those! I'll set it up like Nicks' with a stop and I'll be set!
I was thinking this hull is starting to get a little heavy so my strong little wife helped me get it off the 'bar stool swivel' on to it's tracks. To put the fenders on I'll have to drop the tracks and front idler wheel later. Now I can roll it off the cart on to the lift and then get the turret on the swivel to start messing with it. After the drive motors get here and bolted in then I can install the upper deck.

I was thinking this hull is starting to get a little heavy so my strong little wife helped me get it off the 'bar stool swivel' on to it's tracks. To put the fenders on I'll have to drop the tracks and front idler wheel later. Now I can roll it off the cart on to the lift and then get the turret on the swivel to start messing with it. After the drive motors get here and bolted in then I can install the upper deck.
Last edited by Old MSgt; 05-18-2023 at 10:59 AM.
The following users liked this post:
bowlman (05-18-2023)
The following users liked this post:
Old MSgt (05-18-2023)
05-18-2023, 01:32 PM
#43
If you have a Dremel and a 3D printer, you can cut the slats with a Dremel chop saw.
I printed one of these for my Dremel and it works pretty well: https://www.thingiverse.com/thing:4950836
Or you can get a small hobby chop saw like seen earlier in the thread at Harbor Freight: https://www.harborfreight.com/2-in-m...saw-62136.html
I have one of those and it works well if you go slow with it. Definitely not perfect, but what do you expect for $40.
I printed one of these for my Dremel and it works pretty well: https://www.thingiverse.com/thing:4950836
Or you can get a small hobby chop saw like seen earlier in the thread at Harbor Freight: https://www.harborfreight.com/2-in-m...saw-62136.html
I have one of those and it works well if you go slow with it. Definitely not perfect, but what do you expect for $40.
The following users liked this post:
Old MSgt (05-18-2023)
05-18-2023, 02:32 PM
#44
Nick, I thought the same thing, but I find the saw quite handy for small pieces of brass, wood, acrylic, and styrene. I knocked out (8) 20 degree angled acrylic parts for my Abrams cupola that I used to do by hand with a razor saw. Sped up the process tremendously.
I also bought one of those little table saws from Proxxon for cutting styrene and acrylic sheet. I know styrene can be scored and snapped, but using a table saw with a fence is so much easier especially for styrene that is over 1mm thick.
I also bought one of those little table saws from Proxxon for cutting styrene and acrylic sheet. I know styrene can be scored and snapped, but using a table saw with a fence is so much easier especially for styrene that is over 1mm thick.
Last edited by tankme; 05-18-2023 at 02:35 PM.
05-19-2023, 07:28 PM
#45
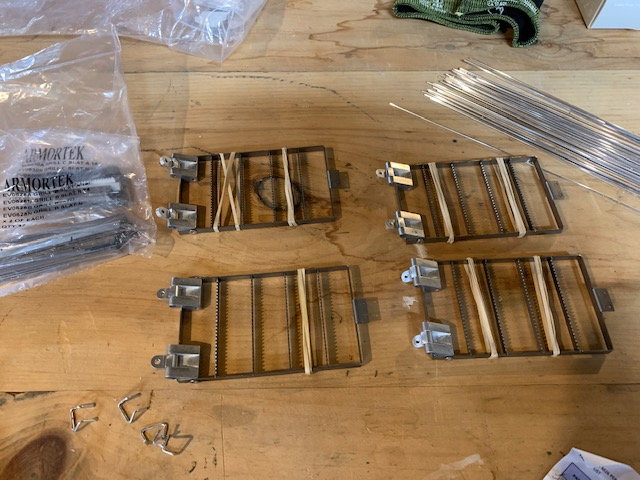
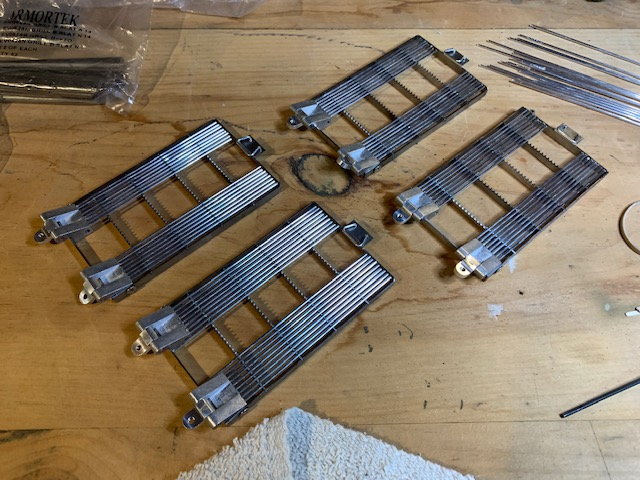
I started on the other set of grills. YIKES! All those slats, each one like a millimeter less than the other. You would think "Oh that's easy to sort out". OK maybe if you have a lot of patients. They are all bundled into one bag, first clean them (a lot of dirt and oil), then lay them down to sort them out.
This is one grill.
Seven equal lengths on either side, that's easy.
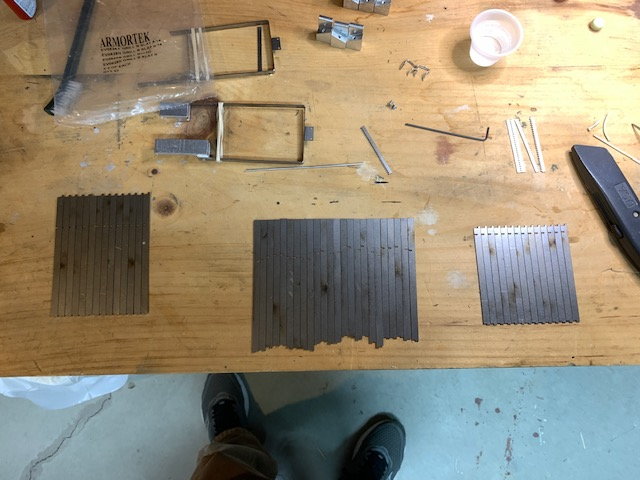
Now to get all the lengths in the right order. There ar two of each so match the pairs then separte when assembling (well that's what I did)
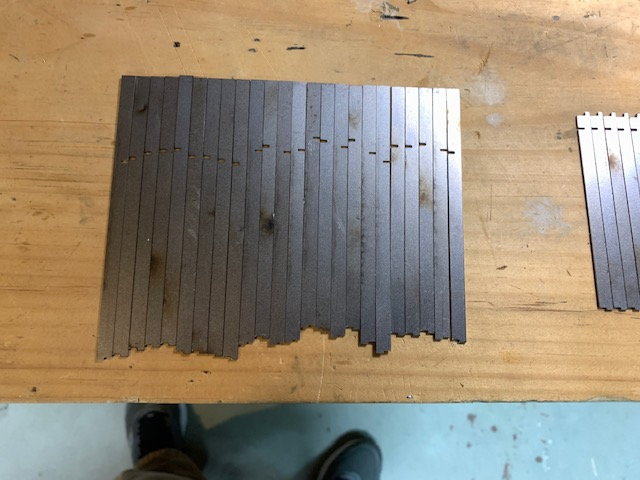
Line them and make sure they are the right lengths.
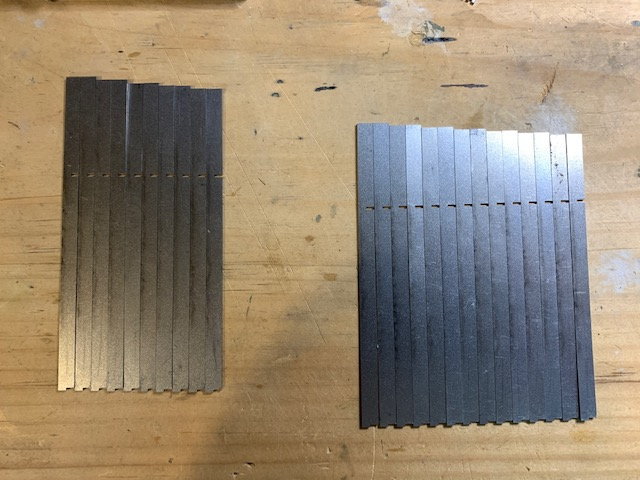
Started to assemble. I used Loctite for these first seven, but I'm switching to five minute epoxy, the Loctite takes too long to cure. Also aligning the slat with the appropriate slot is hard. They want to jump out as you pull the tweezer or your fingers away. But I think one of the cool things about the Persing tank is the grills on the back deck. So I will take my time and try to make these as best I can.
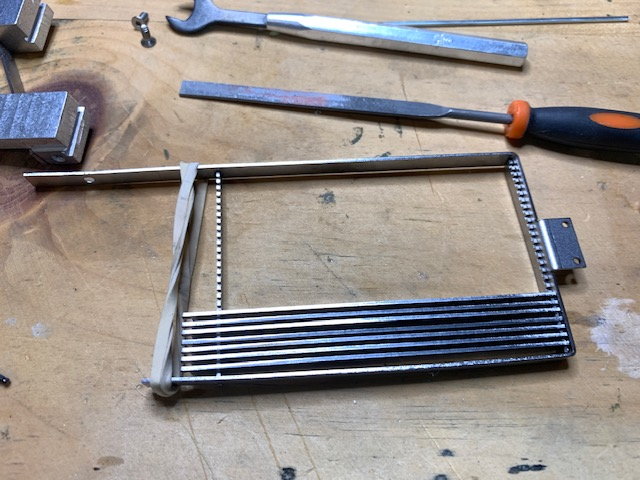
Started on the tracks, those cotter pins are tough but I find the two needle nose pliers method seems to work very well!
This is one grill.
Seven equal lengths on either side, that's easy.
Now to get all the lengths in the right order. There ar two of each so match the pairs then separte when assembling (well that's what I did)
Line them and make sure they are the right lengths.
Started to assemble. I used Loctite for these first seven, but I'm switching to five minute epoxy, the Loctite takes too long to cure. Also aligning the slat with the appropriate slot is hard. They want to jump out as you pull the tweezer or your fingers away. But I think one of the cool things about the Persing tank is the grills on the back deck. So I will take my time and try to make these as best I can.
Started on the tracks, those cotter pins are tough but I find the two needle nose pliers method seems to work very well!
Last edited by Tankhobby; 05-19-2023 at 07:33 PM.
05-20-2023, 06:00 AM
#46
Thread Starter
Well Nick, looking at what it's taken for you to put these grills together SCARES the HECK out of me! Putting those things together will make me have to THINK! And I don't like to think any more than what I have to! I ain't as smart as I look!
And when I go to assemble them and wash the oil off the bare metal they quickly start to get that orange surface rust (which ain't no big thing) but after they set up I'll clean that off right before I prime'em.
And when I go to assemble them and wash the oil off the bare metal they quickly start to get that orange surface rust (which ain't no big thing) but after they set up I'll clean that off right before I prime'em.
Last edited by Old MSgt; 05-20-2023 at 06:12 AM.
05-20-2023, 07:52 AM
#47
NObody's as smart as you look, Mike!! Bwahahaha!!! But you guys are doing a great job on these tanks. I'm major jealous, but still hopeful I'll build one of these some day so I'm learning with every post.
Anyway, just wanted to pop in and let you know I'm thoroughly enjoying this thread. Like I told Paul, I just got a new phone and I can't get the site to recognize the new device. That means I can only post at night after work but after ten hours of the grind I don't always get to posting when I want to. I'd fix that, but I hate the new phone and the new carrier so I won't be keeping this phone, so I figger I'll get things sorted once I get the new phone, then it will be back to, "What do we have to do to shut this joker up!?!!??!!"
Anyway, just wanted to pop in and let you know I'm thoroughly enjoying this thread. Like I told Paul, I just got a new phone and I can't get the site to recognize the new device. That means I can only post at night after work but after ten hours of the grind I don't always get to posting when I want to. I'd fix that, but I hate the new phone and the new carrier so I won't be keeping this phone, so I figger I'll get things sorted once I get the new phone, then it will be back to, "What do we have to do to shut this joker up!?!!??!!"
The following users liked this post:
Old MSgt (05-20-2023)
05-20-2023, 03:16 PM
#48
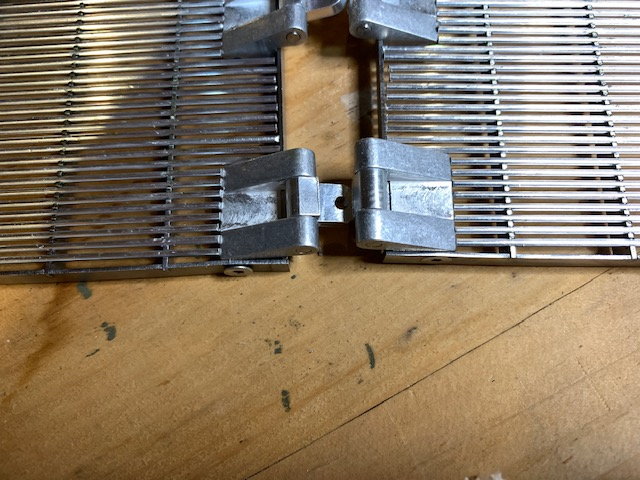
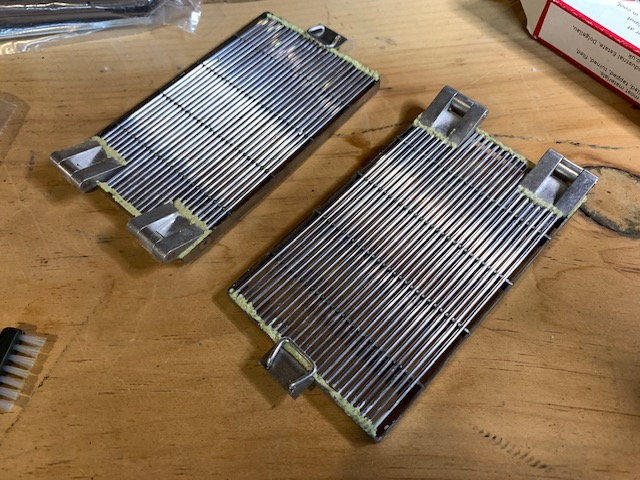
Mike they are not that bad, I was intimidated but I sat back and laid everything out before gluing anything. The first set just got primed, the second set (back of tank) are assembled and welds added with Milliput. There's another set of the back grills I still need to assemble.
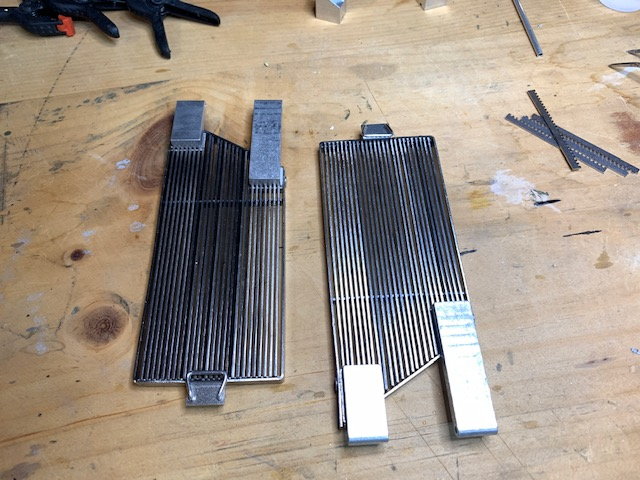
Metal slat grills, the larger ones.

Added welds with Milliput.

Front grills primed, ready for olive drab paint.
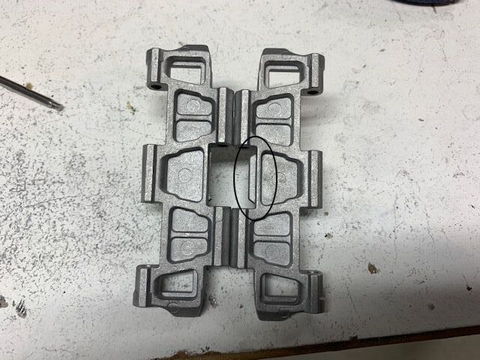
Started on the tracks, had two that had this tab that wasn't grinded off. Anybody else have this issue? Not a problem but annoying because it has to be filed off.
Metal slat grills, the larger ones.
Added welds with Milliput.
Front grills primed, ready for olive drab paint.
Started on the tracks, had two that had this tab that wasn't grinded off. Anybody else have this issue? Not a problem but annoying because it has to be filed off.
06-06-2023, 11:52 AM
#50
Thread Starter
I've been playing with the rc dozer a lot because I'm an 'old' retired heavy equipment operator who still like to 'move some dirt' sometimes!'
But I'm still doing some detail stuff on the Pershing because the Motion Paks ain't arrived yet. I like to install the motors, ESCs, & batteries before the upper deck is put on (even though I try to make inside accessability very easy for later.)
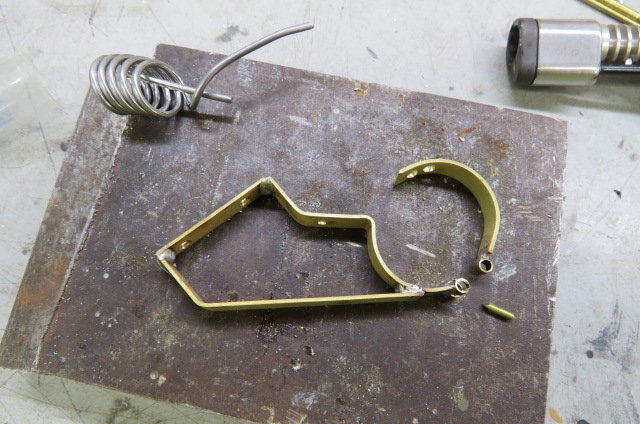
Today I made the .50 storage mount for the turret back and worked on the ejection port, lift rings, and mantlet area and I try to get things JBW'ed on BEFORE I mix the Milliput for the body work. The lower hull & suspension went together a LOT faster than when I start doing the 'little details'.
And Gary, the Jeep springs you told about arrived and I got'em in and, YEAH, a LOT better than those mushy stock springs!! THANKS GARY!!
Mike
But I'm still doing some detail stuff on the Pershing because the Motion Paks ain't arrived yet. I like to install the motors, ESCs, & batteries before the upper deck is put on (even though I try to make inside accessability very easy for later.)
Today I made the .50 storage mount for the turret back and worked on the ejection port, lift rings, and mantlet area and I try to get things JBW'ed on BEFORE I mix the Milliput for the body work. The lower hull & suspension went together a LOT faster than when I start doing the 'little details'.
And Gary, the Jeep springs you told about arrived and I got'em in and, YEAH, a LOT better than those mushy stock springs!! THANKS GARY!!
Mike