


Scale finishing my BVM Hun
 10-14-2015, 09:33 PM
#26

Thread Starter

Thanks Greg  This is really turning in to a project.. (4 year off and on)
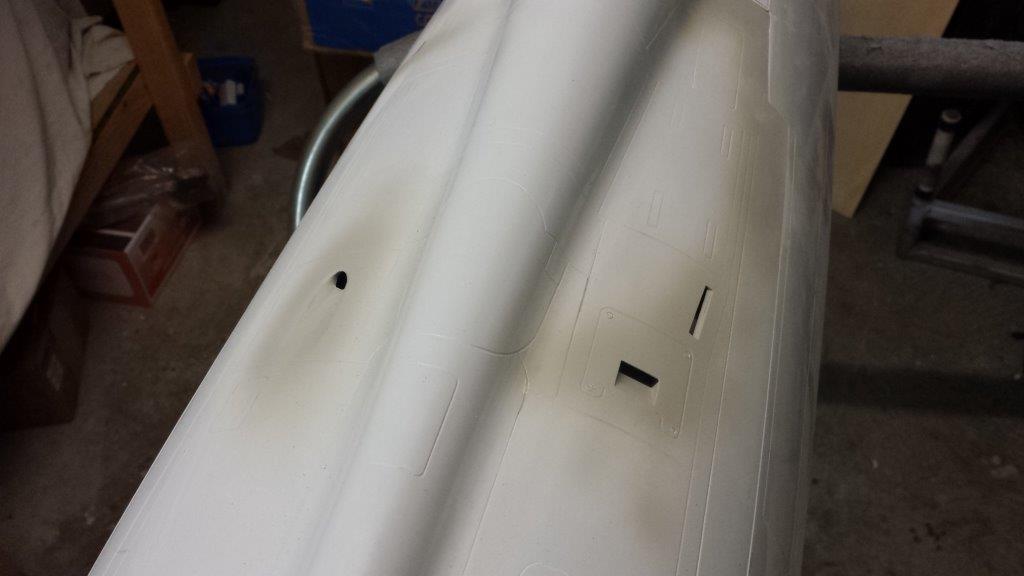
I forgot to mention.... The covered access panels which I put Aerofoil aluminium tape on.. The tape in these areas creates a slightly raised surface. After painting, and weathering, the panels stand out just that little bit. Hopefully replicating a real access panel, when it is being constantly handled..
The weathering is a mix of air brushed base paint, and/or oil based artist paint which is rubbed on and washed in.
Some close up pics of these panels.. I have tried to keep the weathering as subtle as possible (on the upper surfaces anyway)..


This is really turning in to a project.. (4 year off and on)I forgot to mention.... The covered access panels which I put Aerofoil aluminium tape on.. The tape in these areas creates a slightly raised surface. After painting, and weathering, the panels stand out just that little bit. Hopefully replicating a real access panel, when it is being constantly handled..
The weathering is a mix of air brushed base paint, and/or oil based artist paint which is rubbed on and washed in.
Some close up pics of these panels.. I have tried to keep the weathering as subtle as possible (on the upper surfaces anyway)..
Last edited by roger.alli; 10-14-2015 at 09:38 PM.


 10-15-2015, 04:56 PM
#32
I see that as "puce" a gray"ish" , almost kinda / sorta purple .
There no pure purple in that picture .
What im trying to get across is the some ot hot section renditions out there are just silly .
We've all seen them .
There no pure purple in that picture .
What im trying to get across is the some ot hot section renditions out there are just silly .
We've all seen them .
10-15-2015, 07:02 PM
#33
Thread Starter
I did a fair bit of research, (read that as I spent time at work trawling the net looking for photos!). What I discovered is that most operational planes had very little pink/red/blue, but were mostly plain brownish titanium colour. Like the Cutsall Hun and this Vietnam combatant.


There were exceptions though, this ANG Hun definitely has a purple/blue look. It seems to be operational when this pic was taken.

There are a lot photos of non operational planes showing colour.. I did read somewhere that is was quite common for service crew to change the titanium skin in the hot section..


So there seems to be a lot of variation, but I have to agree with Jetmaven, some of the RC "Scale" renditions I have seen are a bit cartoonish..
There were exceptions though, this ANG Hun definitely has a purple/blue look. It seems to be operational when this pic was taken.
There are a lot photos of non operational planes showing colour.. I did read somewhere that is was quite common for service crew to change the titanium skin in the hot section..
So there seems to be a lot of variation, but I have to agree with Jetmaven, some of the RC "Scale" renditions I have seen are a bit cartoonish..
10-15-2015, 07:43 PM
#34
Thread Starter
The F-100 has a lot of vents and intakes. Some of these are moulded in to BVM fuse, which is nice, but not altogether convincing. To improve some of these I have opened them up and used some thin ply/poly ply to build depth.
I have no idea what the side nose vents are for. The D (single seat) has just one each side while the F has 2 per side??
Full size pics.


\
This series of pics show the process of building the vents


Gun exhaust ports, Ram air trubine exhaust and other vents were similarly treated. The inside of the vents are lined with lite ply to add depth.

And when painted these really add some depth and dimension to the model.. (this pic is during the weathering process.)

I have no idea what the side nose vents are for. The D (single seat) has just one each side while the F has 2 per side??
Full size pics.
\
This series of pics show the process of building the vents
Gun exhaust ports, Ram air trubine exhaust and other vents were similarly treated. The inside of the vents are lined with lite ply to add depth.
And when painted these really add some depth and dimension to the model.. (this pic is during the weathering process.)

 10-16-2015, 05:34 AM
#38
To the contrary , the hot section can be one of the most distinctive , eye catching ,features
The full scale pictures posted within this and a lot of other threads on the subject tell a different color story .
The full scale pictures posted within this and a lot of other threads on the subject tell a different color story .
 10-19-2015, 10:30 AM
#40

My Feedback: (167)
The F100's with purple-ish colors are not made up colors. Do enough research and you will find some very dis-colored titanium hot sections. They are not the majority but they are nevertheless scale.
Even though the pictures of the severely dis-colored hot sections may have been taken after the F100 was no longer operational, they didn't get to be those colors by simply sitting out in the hot sun.
Air brushing is one thing but when you use the real titanium and heat the surface the metal will turn whatever the natural color is for the amount of heat applied. No different than the real one I suppose.
Last edited by Gary Jefferson; 10-19-2015 at 10:36 AM.
10-19-2015, 09:22 PM
#42

Tailormade Decals are the best I've worked with. He makes some dry transfer but mostly decals. Was not thrilled with decals at first but the results are surprisingly good.
The book "Bury Us Upside Down" was a fantastic read. Would love to make a Camo Hun some day in this scheme just for the history. In the book some guys flew D models on some Misty missions, but yes most of the hard anti-SAM work was done with 2 seaters.
The book "Bury Us Upside Down" was a fantastic read. Would love to make a Camo Hun some day in this scheme just for the history. In the book some guys flew D models on some Misty missions, but yes most of the hard anti-SAM work was done with 2 seaters.
10-19-2015, 09:29 PM
#43
Thread Starter
What I have learned, no two F-100s ever looked the same. They ALL changed their paint schemes and configuration/adornments as they aged through operational requirements and maintenance schedules. I have photos of my subject in three different paint schemes, with different rudders, different fuel probe, different drop tanks.
The best I can hope is to represent the full size at just one point in time in its life. Using 50 year old photos, reproduced on the internet!!
10-19-2015, 09:40 PM
#44
Thread Starter
10-20-2015, 09:59 AM
#47
Hello Roger painting this as he was coming out of the new factory. Will a few more months of assembly. But is already in the final stretch. It will be equipped with a P-180.
10-20-2015, 04:21 PM
#48
Thread Starter
Guns,
The F-100 D (single seat) was fitted with four 20 mm guns, mounted in the lower fuse, just under and forward of the cockpit. (The F model, two seater, had only two guns). The only externally visible part of these guns is the tips of the barrels, located at the rear of four recesses in the forward fuse skin.


The BVM mould has the recesses nicely replicated, but without the gun barrels,
To replicate this I made some gun barrels using, two sizes of ali tube, and short lengths of both 4 & 6mm fuel tube.
These were glued into the gun recesses, and “Bobs yer Uncle,” Guns on board..


At the finishing stage, I painted in the dark gun panels using BVM metal coat, and then added weathering/gun blast residue, using an air brush and some very thin charcoal paint.. The Viet Nam Huns got pretty dirty in this area.
Note how I have tried to create a “sloppy” repainted look with a blurring of the camo green on the paint line. This is scale for 63 -163..


The F-100 D (single seat) was fitted with four 20 mm guns, mounted in the lower fuse, just under and forward of the cockpit. (The F model, two seater, had only two guns). The only externally visible part of these guns is the tips of the barrels, located at the rear of four recesses in the forward fuse skin.
The BVM mould has the recesses nicely replicated, but without the gun barrels,
To replicate this I made some gun barrels using, two sizes of ali tube, and short lengths of both 4 & 6mm fuel tube.
These were glued into the gun recesses, and “Bobs yer Uncle,” Guns on board..
At the finishing stage, I painted in the dark gun panels using BVM metal coat, and then added weathering/gun blast residue, using an air brush and some very thin charcoal paint.. The Viet Nam Huns got pretty dirty in this area.
Note how I have tried to create a “sloppy” repainted look with a blurring of the camo green on the paint line. This is scale for 63 -163..
Last edited by roger.alli; 10-20-2015 at 04:23 PM.
10-20-2015, 05:09 PM
#49
Member
Join Date: Oct 2015
Posts: 54
Likes: 0
Received 0 Likes
on
0 Posts
Fantastic work!
These are are my favorite threads.
Some race bikes have titanium exhausts and I've seen all sorts of very beautiful and vivid colors develop as the new metal goes through heat cycles. Bikes from different parts of the country have different colors. Pretty cool!
These are are my favorite threads.
Some race bikes have titanium exhausts and I've seen all sorts of very beautiful and vivid colors develop as the new metal goes through heat cycles. Bikes from different parts of the country have different colors. Pretty cool!
01-13-2016, 07:27 PM
#50
Thread Starter
So this is what I did during the holidays.
Finishing the cockpit. I had great difficulty finding a pilot that would fit in the 1/7th cockpit.. After a couple of false, leads I finally ordered a Skymaster 1/7[SUP]th[/SUP]. I was not completely happy with him, his hands are too big, the size of the flying jacket zipper is just silly, and he was pretty damn heavy. So, I dissected him to loose some weight.
This is all his original parts, after dissection.

To lighten him up I replaced his limbs with peanut packing, ditched his boots, and took to his ripped muscular torso with a dremel.

The end result, sitting in the cockpit.

Finishing the cockpit. I had great difficulty finding a pilot that would fit in the 1/7th cockpit.. After a couple of false, leads I finally ordered a Skymaster 1/7[SUP]th[/SUP]. I was not completely happy with him, his hands are too big, the size of the flying jacket zipper is just silly, and he was pretty damn heavy. So, I dissected him to loose some weight.
This is all his original parts, after dissection.
To lighten him up I replaced his limbs with peanut packing, ditched his boots, and took to his ripped muscular torso with a dremel.
The end result, sitting in the cockpit.