


1/10th scale Hydro Build
 10-25-2020, 03:56 PM
#1

First post though I've been lurking for a while. I built a couple of vee's many, many years ago and decided recently to have a go at something more complex. Not sure if I've gone too deep with such little experience, but come along with me and find out 
Please comment if you have any suggestions or notes for me, any help would be greatly appreciated. Thinking of running electric so any advice on what I need there would be helpful too. I don't think it's going to be alight boat, but not too worried about outright speed. Maybe on the next build, if I get that far.
I've got the frame glued up, and the next job is to figure out the leading edges and glue in the deck strips.
I just realised I can't post images or links till I've got 10 posts, so I'll do that soon.
 10-25-2020, 04:15 PM
#2
It's the Pay n Pak turbine boat, using the Greg Finlay plans that are floating around the internet. If I have some success the end goal would be to buy some Newton plans and build a 1/8 FE or even nitro. For now, if I can build this reasonably and get it to the pond for a few races and see if I enjoy it as much as I think I will.
10-26-2020, 02:47 AM
#3


I just have a couple of questions:
1) Since you're using plans, that means you have to cut out your parts. What are you using to make your parts from, balsa or ply?
2) Since you plan on racing, where are you located?
3) Have you found a rule book on the class of boat you're building? I know the battery type and output are regulated, as are the size of motor
10-26-2020, 03:08 AM
#4
Hey HJ,
1) I'm using ply. It's only basswood, as birch is extremely expensive here. I think if I build a more serious one, and I've had more experience, it'll be birch.
2) I'm in Sydney, Australia. There is a club here at the Olympic village, I plan on getting out to meet with them and see what they're running. Plus I haven't raced before so it will be good to see what it's all about. A bit harder with covid, or I would have already done it.
3) I'm not 100% sold I'll race this one, it might just be something to gain experience with. However, it would be smart to try to build to a class incase I decide I do want to race it. The rules are under "The Australian Model Power Boat Association 2019 Official Rule Book". I'd link it but I can't yet
I think the FE class would look like this (again, excuse the info dump but I can't link it):
17.2 PROPULSION CELL AND BATTERY SPECIFICATIONS
2. PROPULSION BATTERY CLASSIFICATIONS
a. EA: The battery shall have:
i. up to 4 LiPo cells (maximum battery weight of 650g)
ii. a maximum nominal voltage of 14.8V.
b. EB: The battery shall have:
i. 5 - 6 LiPo cells (maximum battery weight of 975g)
ii. a maximum nominal voltage of 22.2V.
c. EC: The battery shall have:
i 7 - 12 LiPo cells (maximum battery weight of 1,950g)
ii a maximum nominal voltage of 44.0V.
17.3. MOTOR SPECIFICATIONS
a. Open Motors can be any permanent magnet motor.
b. A boat must have a means of starting and stopping the motor by radio control.
17.4 HULL CLASSIFICATIONS
1. Mono, Hydro and Tunnel hulls may be separated into classes according to the combination of hull type and class of battery used.
2. Sport Hydro
a. The intent of the Sport Hydro class is to provide a racing class that resembles full size hydroplanes, without requiring scale detail.
b. Hull specifications shall be as per Section 20.2 (Petrol Sports Hydro).
20.2 HULL SPECIFICATION
1. The hull must resemble a limited or unlimited hydroplane design of the past or present with the exception that
(outrigger, modified outrigger and/or tunnel hulls are not permitted in this class).
2. Sport hydroplanes may have more than two riding surfaces touching the water at planing speeds.
3. The hull can contain rear wings and/or front wings.
4. A Canard hull defined as having two rear sponsons and a single forward sponson, will be allowed to run in this class.
5. The sponsons may have pads or breaks that contact the water at planing speeds.
6. The boat must have a name and/or sponsor’s name, logo and AMPBA racing number affixed to hull (a local,
national, or fictitious sponsor name is acceptable).
7. If the bow is recessed behind the tips of the sponsons, the recess must be no larger than 25% of the overall length of
the boat.
8. The boat must have a driver and cockpit/or defined simulated enclosed cockpit.
Last edited by Vilante; 10-26-2020 at 03:10 AM.
10-26-2020, 03:53 AM
#5
I like it, someone that's doing their homework before spending a bunch of money 
I'm pleased to read that you didn't use balsa. The problem with balsa is that it tends to be like a sponge in that it absorbs water quickly if not sealed completely and is very brittle. I know there are some that use it and claim it's a great material but I wouldn't use it.
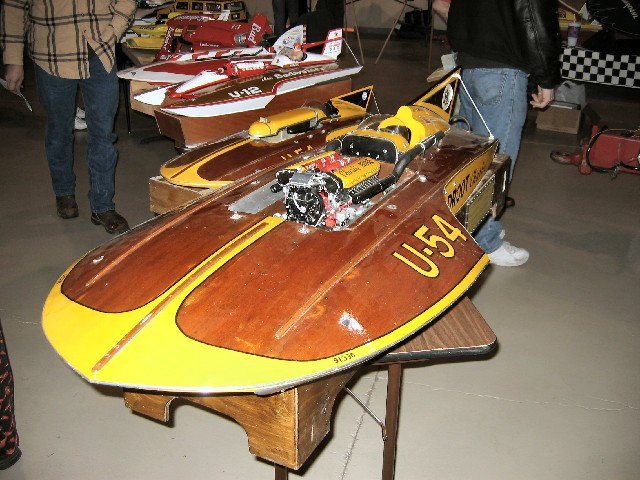
Definitely talk to the guys at the club. There's a lot of things that you will need to know/learn and it's a lot easier to do so face to face. When I built my first boat kit back in 1982, I discovered just how little I actually did know the first time I put it on the water. By the time all was said and done, I ended up taking what I could reuse out of the boat and threw what I couldn't in the trash. I was amazed at the learning curve and just how bad my boat was. Fast forward to now and this is what I race:

Before you ask, it's a 1/8th scale powered with an 11cc nitro engine. It's 109.25cm long and 55.9cm wide so it's not exactly small and is capable of over 100KPH
I'm pleased to read that you didn't use balsa. The problem with balsa is that it tends to be like a sponge in that it absorbs water quickly if not sealed completely and is very brittle. I know there are some that use it and claim it's a great material but I wouldn't use it.
Definitely talk to the guys at the club. There's a lot of things that you will need to know/learn and it's a lot easier to do so face to face. When I built my first boat kit back in 1982, I discovered just how little I actually did know the first time I put it on the water. By the time all was said and done, I ended up taking what I could reuse out of the boat and threw what I couldn't in the trash. I was amazed at the learning curve and just how bad my boat was. Fast forward to now and this is what I race:
Before you ask, it's a 1/8th scale powered with an 11cc nitro engine. It's 109.25cm long and 55.9cm wide so it's not exactly small and is capable of over 100KPH
10-26-2020, 04:04 AM
#6
10-26-2020, 04:28 AM
#7
Don't thank me yet. You still have a long way to go along that learning curve. For sake of conversation, it would be kind of like driving from your city(which I haven't been to yet but have a friend that's invited the wife and I to visit) to Perth(which I have been to), following the coast, figuratively speaking anyway.
Please tell me that you have plenty of clamps, sanding blocks, tools and a building jig so the boat will be straight and not requiring 3+ pints after every building session to maintain a reasonable amount of sanity")
Please tell me that you have plenty of clamps, sanding blocks, tools and a building jig so the boat will be straight and not requiring 3+ pints after every building session to maintain a reasonable amount of sanity
10-26-2020, 04:31 AM
#8
Just got to thinking, this thread might help if you can ignore everything about the nitro engine and fuel tank installation:
Re-Engineering A Dumas Pay'N Pak
There are lots of pictures included, if that would be helpful. It's only 76.2cm long so it's closer to your Pay'N Pak build as far as size
Re-Engineering A Dumas Pay'N Pak
There are lots of pictures included, if that would be helpful. It's only 76.2cm long so it's closer to your Pay'N Pak build as far as size
10-26-2020, 02:38 PM
#9
Great analogy. My family did that drive when I was in high school, it was epic to say the least. It took 2 weeks, but we were taking our time of course.
I've got lots of clamps but I could probably use more. I've been using a scroll saw and bench sander mainly, with a little finger sander for inside corners. I've built a building board too.
Thanks for the link, I'll have a read through that for sure!
I've got lots of clamps but I could probably use more. I've been using a scroll saw and bench sander mainly, with a little finger sander for inside corners. I've built a building board too.
Thanks for the link, I'll have a read through that for sure!
Last edited by Vilante; 10-26-2020 at 04:04 PM.
10-26-2020, 08:33 PM
#10
I used that distance analogy because it's I knew it was something that most would understand. To just say there's a "learning curve" is putting out an abstract concept, kind of like saying A+B=CxD in a math formula. Getting the boat on the water for the first time would be like traveling from Sydney to Adelaide. While the whole trip to Perth is roughly 5100Km and 55 hours, getting to Adelaide is only 1950 Km and 22.5 hours. The other 3150Km and 32.5 hours would be the time and work needed for testing props, dialing in the balance, setting turn fin and thrust angles, etc. Getting back to the distance and time, the wife and I went the same distance as the coastal run from Sydney to Perth in four days of travel time last year going from Seattle to Phoenix to Dallas to Memphis to Huntsville Alabama. By the time we got home, we had gone to Atlanta Georgia(our actual destination) and then home by travelling across the middle of the country and travelled a total of 10,500Km.
10-27-2020, 04:31 AM
#12
Not really what I would call an "epic" journey, that would be from Seattle to San Diego to Hawaii to the Philippines to South Korea, back to the Philippines and then to the shore of Masirah Island(Oman) to Perth/Freemantle, back to the Philippines, Hawaii, San Diego and then home, being Seattle. That's roughly 53,750KM and all of that was by sea except the first and last 1800Km
10-28-2020, 02:14 AM
#14
Oh geez, you would have to ask those two questions. You're making me think use my memory, ARRRGH!!! THAT HURTS THE HEAD!!!!!!!!!!!!!!!!!!!
Okay, let me see:
Okay, let me see:
- 1982, built my first boat, a Dumas sport 20 Pay'N Pak. Boat was a barge, being that it was overweight, under powered and not well built
- 1986, built my second boat, a Dumas sport 40 Atlas Van Lines. Like the Pak, it was a barge and, even thought I followed the directions to the letter, it was still improperly built for a race boat.
- 1988-1993, built 5 scale boats, all destroyed by the ex-wife before getting them on the water
- 1994-1996, helped convert or restore several 1960s vintage full size unlimiteds.
- 1997-2000, started working on a 1991 Miss Madison and later converted into a 1999 version. Due to money issues, it's still waiting for a custom sized cowl(tried to go too scale so off the shelf parts won't work) as well as the deck being installed.
- 2008(?), bought and started restoration of a Fiberglass 1978 Circus Circus
- 2011, built the 1973 Pak linked to earlier in this thread, ran it for the first time July 2nd of that year in Evansville Indiana, started a 1985 U-8 Executone
- 2015, bought the Elam raced 3-8 times per year since, not counting 2019 or 2020
- 2016 to present, working on a replacement wood hull for the Elam, two scale 1973 Pay'N Paks, 2009 Oh Boy!! Oberto and a gas scale 1978 Miss Madison
- Since 1994, I've helped build several other boats with other people, several of which have raced
Last edited by Hydro Junkie; 10-28-2020 at 02:17 AM.
10-28-2020, 04:51 PM
#15
WOW, that is an impressive list of builds!
How did you come to work on full size boats, that must have been very interesting. I've been reading through the rebuild of "The Squire Shop" build, amazing amount of work and skill goes into them.
How did you come to work on full size boats, that must have been very interesting. I've been reading through the rebuild of "The Squire Shop" build, amazing amount of work and skill goes into them.
10-29-2020, 02:13 AM
#16
In three words, I WAS DRAFTED!!!!!
Now, to make that make sense, I need to put some context to it. After my ex-wife had destroyed my boats(took them into the parking lot of the apartment complex we were living at and ran her car back and forth over them until they were nothing but splinters), she went to live with another guy who talked her into moving with him 1300Km away to Reno Nevada. I was forced to move back to my parents house(not a good thing) where I started working on another boat, I think that one was a 1989 Budweiser. Anyway, I came across a question I had about the plans and, since I knew Roger Newton personally, I decided to give him a call and ask. He wasn't home but his wife told me he was at the Hydroplane and Raceboat Museum in South Seattle. Since I had nothing to do, I drove the 80Km to the HARM, only to find a group of 10 or so guys working on a vintage boat, in this case, the Slo-Mo-Shun V. When I went to ask Roger my question, he answered it and then asked me "Are you doing anything this evening?" When I said no, he handed me a grinder and a block of wood and told me to make the wood disappear or, more accurately, turn it into sawdust so it could be used as thickener in the glue they were using to put the boat together. I spent every Wednesday evening and all day Saturday for the next several months at the HARM working on rebuilding the boat. It was a lot of work but the people made it fun and, more importantly, it got me out of my parents house and away from my very condescending mother. I've helped on other boats since, just not to the same extent as I did on the "Mo". What made all the months of work worth it was when owner/driver Ken Muscatel fired up the Merlin engine and the boat pulled away from the dock.
How times have changed. The HARM has moved from it's storage shed like original location in south Seattle to a very nice location Kent(20 minutes south of Seattle) with an engine shop, maintenance and restoration area historical archives and showroom. Unfortunately it's presently closed except for the people working on a couple of boats due to Covid 19. Worse still, my friend Roger Newton is no longer with us and the Slo-Mo-Shun boats haven't been on the water in ages. This is where I can say THANK YOU YOUTUBE!!!! I can still get to see some of the things at the HARM by video, such as this one that shows my favorite two boats, the Slo-Mo-Shun V(which I always refer to as my boat, regardless of who actually owns it) and the boat that got me into R/C boating, the original winged boat, the 1973 Pay'N Pak
Now, to make that make sense, I need to put some context to it. After my ex-wife had destroyed my boats(took them into the parking lot of the apartment complex we were living at and ran her car back and forth over them until they were nothing but splinters), she went to live with another guy who talked her into moving with him 1300Km away to Reno Nevada. I was forced to move back to my parents house(not a good thing) where I started working on another boat, I think that one was a 1989 Budweiser. Anyway, I came across a question I had about the plans and, since I knew Roger Newton personally, I decided to give him a call and ask. He wasn't home but his wife told me he was at the Hydroplane and Raceboat Museum in South Seattle. Since I had nothing to do, I drove the 80Km to the HARM, only to find a group of 10 or so guys working on a vintage boat, in this case, the Slo-Mo-Shun V. When I went to ask Roger my question, he answered it and then asked me "Are you doing anything this evening?" When I said no, he handed me a grinder and a block of wood and told me to make the wood disappear or, more accurately, turn it into sawdust so it could be used as thickener in the glue they were using to put the boat together. I spent every Wednesday evening and all day Saturday for the next several months at the HARM working on rebuilding the boat. It was a lot of work but the people made it fun and, more importantly, it got me out of my parents house and away from my very condescending mother. I've helped on other boats since, just not to the same extent as I did on the "Mo". What made all the months of work worth it was when owner/driver Ken Muscatel fired up the Merlin engine and the boat pulled away from the dock.
How times have changed. The HARM has moved from it's storage shed like original location in south Seattle to a very nice location Kent(20 minutes south of Seattle) with an engine shop, maintenance and restoration area historical archives and showroom. Unfortunately it's presently closed except for the people working on a couple of boats due to Covid 19. Worse still, my friend Roger Newton is no longer with us
and the Slo-Mo-Shun boats haven't been on the water in ages. This is where I can say THANK YOU YOUTUBE!!!! I can still get to see some of the things at the HARM by video, such as this one that shows my favorite two boats, the Slo-Mo-Shun V(which I always refer to as my boat, regardless of who actually owns it) and the boat that got me into R/C boating, the original winged boat, the 1973 Pay'N Pak
Last edited by Hydro Junkie; 10-29-2020 at 02:15 AM.
10-29-2020, 02:47 AM
#17
Outside of the ex ruining your boats (how awful) that's an amazing story. That would have been quite some experience, working on those full size boats.
I'm not sure we have any of the big unlimited's in Australia, but it's great to see how bit it is over there. My Grandfather used to take me to the yearly power boat spectacular at St George Motor Boat Club here in Sydney, and I fondly remember 2 of them showing up, tilted on their trailer, cranes ushering them into the water. I was in awe, a young kid next to these giant machines. I'll never forget it.
I'm not sure we have any of the big unlimited's in Australia, but it's great to see how bit it is over there. My Grandfather used to take me to the yearly power boat spectacular at St George Motor Boat Club here in Sydney, and I fondly remember 2 of them showing up, tilted on their trailer, cranes ushering them into the water. I was in awe, a young kid next to these giant machines. I'll never forget it.
10-29-2020, 02:51 AM
#18
Something I should have mentioned in my last post is it was my time working with the crew that restored the Slo-Mo-Shun V that really taught me how to build a radio controlled hydroplane. Roger Newton was, for lack of a better way to say it, a perfectionist when it came to the boat. When a part was installed, the hardware couldn't be damaged in any way as he wanted the boat to look like a museum worthy restoration, much like it's older sister(Slo-Mo-Shun IV) which, after a restoration and a couple of runs on Lake Washington, was put back into it's long time home, The Museum of History and Industry in the vicinity of the University of Washington in north Seattle. Roger even took it so far that, when the deck was installed, it was fastened down with nails and glue as it was originally. To prevent damaging the expensive diagonal cut mahogany plywood when driving the nails, they all had to be left partially undriven. After the deck was totally installed, a couple of people were given light weight hammers and nail sets to finish the nailing process. Roger almost exploded when he found one of the "nailers" had missed a nail head and slightly damaged the plywood next to the nail. It was something that couldn't be fixed as the wood was unpainted so it couldn't be filled and to remove the piece and replace it would cause more damage than anyone would have wanted to fix, even Roger. The hole(which didn't even go all the way through) was left as it was and, when the deck was "varnished", the hole was filled with that so, unless you know where to look, you would never even notice it.
I guess you could almost say that Roger Newton, the father of R/C Unlimiteds, was the person that taught me how to build a scale hydroplane.
Now, with that said, the person that influenced my wanting to build a boat that looked like the full sized one in every detail was another member of R/C Unlimiteds, Howard Price. Howard was someone that would spend days on a little detail that most wouldn't even see. He would machine parts on a 1.5 meter metal lathe or 2 meter Bridgeport mill that would take hours of work to "get right". Like Roger, he's no longer with us but his legacy lives on. His last large boat was a 1/6th scale petrol powered model of the Wildroot "Charlie", another mahogany boat from the late 1950s. The metal work on that boat is unbelievable in the details and to the level of accuracy he put into it.
Last edited by Hydro Junkie; 10-29-2020 at 03:05 AM.
10-29-2020, 02:56 AM
#19
That story reminds me of my Grandfather again, he was very meticulous when it came to building things, hobby or otherwise. I'm trying to teach myself a similar level of patience!
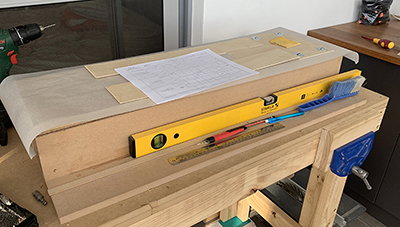
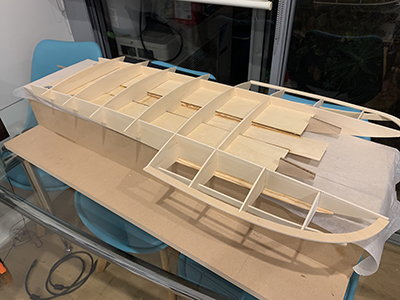
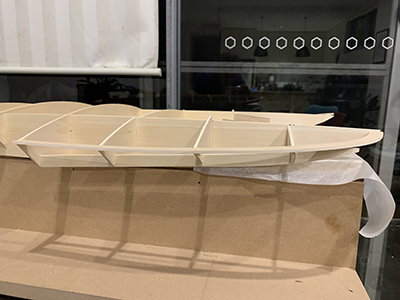
I think I can post some pictures! This is the building board.
Floor glued in
I think I can post some pictures! This is the building board.
Floor glued in
Last edited by Vilante; 10-29-2020 at 03:03 AM.
 10-29-2020, 03:06 AM
#21
You want to see meticulous, go back and look at my last post. Pictures don't do that boat justice, especially when you consider that it's 152.5cm long
Last edited by Hydro Junkie; 10-29-2020 at 03:10 AM.
10-29-2020, 03:08 AM
#22
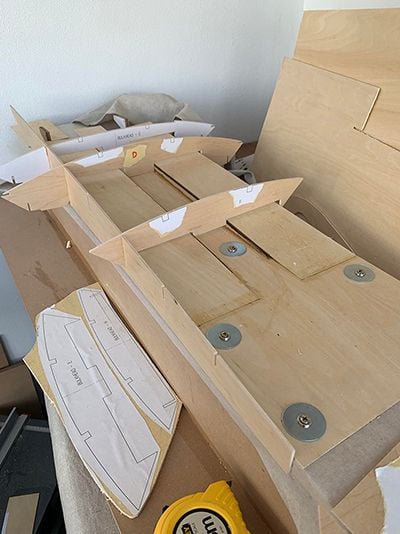
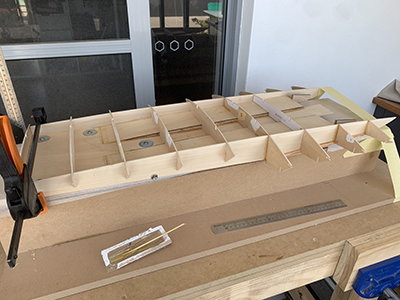
Gluing up the rest of the frame
All glued just before it goes back on the board

Next I need to work out how the front fits together so I can install the deck strips. This design seems to do without the internal stringers.
I'm also wondering whether I should be putting some small square dowel in some joins for strength, but it seems mighty strong for what it is.
I'm using West Systems flexible epoxy.
All glued just before it goes back on the board
Next I need to work out how the front fits together so I can install the deck strips. This design seems to do without the internal stringers.
I'm also wondering whether I should be putting some small square dowel in some joins for strength, but it seems mighty strong for what it is.
I'm using West Systems flexible epoxy.
10-29-2020, 03:09 AM
#23
10-29-2020, 03:48 AM
#24
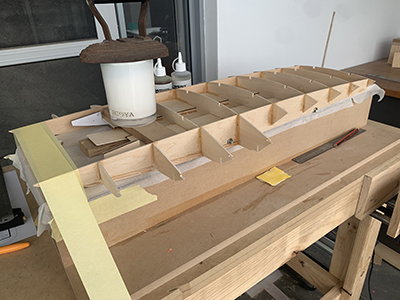
As for recommendations on added glue blocks, here you go:
1) I'd add 3mm(or larger) blocks on one side of the joint where the front two sponson framed are glued to the sponson insides
2) I'd add the same or, preferably, 6mm blocks along the bottom to sponson inside joint between the cross frames
3) I'd add 6mm blocks on both sides of the left sponson transom to outside of the sponson inside
4) I'd add a doubler on the inside of the right sponson transom and a glue block on the rear side
These are all areas that won't hold up without bracing. The sponson transoms take a beating when the boat is running so they could fail without added strengthening. The bottom to sponson inside joint is constantly being stressed by the water pulling and pushing on the sponsons. A butt joint here won't hold up before either pulling the wood loose or breaking it all together.
As far as the glue blocks go, I'd rip them diagonally into triangle stock. This will still give the same gluing area and strength but with half the weight
10-29-2020, 03:51 AM
#25
Just got to thinking. It might not be a bad idea to re-enforce the rear transom joints in the same way as the left sponson transom. That area has to handle the stress of the strut, prop and driveline as well as the rudder and tail structure