


Welcome to Club SAITO !
 03-12-2014, 05:11 PM
Gentlemen,
I have 3 kits still in the box begging to built. I have a newly rebuilt Saito FA-91 crying to be installed. But I'm in deep pits of glum. I have recently moved and have discovered much more remodeling that needs to be completed before I can start on the setup of the new Build Room. It could be early Fall before I'm able to stretch a new set of plans across the build table. Oh whoa is me!
I have 3 kits still in the box begging to built. I have a newly rebuilt Saito FA-91 crying to be installed. But I'm in deep pits of glum. I have recently moved and have discovered much more remodeling that needs to be completed before I can start on the setup of the new Build Room. It could be early Fall before I'm able to stretch a new set of plans across the build table. Oh whoa is me!
 03-13-2014, 12:40 AM
Senior Member
Join Date: Apr 2010
Location: Cairns, AUSTRALIA
Posts: 1,053
Likes: 0
Received 0 Likes
on
0 Posts
The bright side of moving is finding all sorts of stuff you forgot like Saito open rocker 40's (2 off) a Flightlines kit of a Great Lakes trainer (1 off) down side is spilling that draw of very small tools and other goodies. I have found 20 Saitos in various stages of assembly, diesels long forgotten. Enpugh kits building 3 per year to last me until I am about 125 years old and so it goes. Now to build the new "perfect" workshop
03-17-2014, 12:58 PM

My Feedback: (11)
Join Date: Dec 2003
Location: Sacramento,
CA
Posts: 16
Likes: 0
Received 0 Likes
on
0 Posts
That makes more sense than the 150 bore/120 stroke as the 120 bore/150 stroke combo comes up to 2.698 cu in, although Clarence quotes a stroke .5mm longer. Make sure you get a set of Teflon buttons for the wrist pins as according to Clarence Lee, the original 270 piston uses a step on one side of the wrist pin bore instead of a button. You will need a total of 4 of them. If you don't have 4, order Part# SAI300T08.
Try to avoid bead blasting as it might then be more prone to staining. If you bead blast get some Harley Davidson flat aluminum case paint & bake it @ 300�F for a few hours after it dries. Let it cool before handling as the paint is vulnerable to easy damage until it has cooled. After that it will be impervious to just about anything. Next best thing is high temp engine paint from an auto parts retailer. There are several methods of cleaning the case posted on this site. Soaking in a crock pot filled W/anti-freeze is recommended by some but i have too many animals around to chance that.
My personal preference is the bead blast/baked on case paint method.
As for the bead blasting, that was the original finish - I think I will blast it as lightly as I can and then possibly paint with some high temp clear engine paint and bake it. I did try the crock pot method on the cylinders and it worked fine, they came out looking nice and clean. I'll just need to touch up a few chips in the black paint. The crankcase itself has some oxidation to it as bare aluminum eventually will do - the bead blaster is the only thing I know that will remove it.
The cylinder with the seized piston has a very small amount of aluminum wiped on it...I will go over that for a while using Scotchbrite and see if that will clean it up.
I have a set of bearings here from Boca Bearing. I was able to get the crankcase and crankshaft separated using a heat gun to soften up the old oil and expand the aluminum castings. Now I have the bare crank out on my table and I am ready to replace the bearings. I tried heating it up in the oven at about 325, thinking that would free the bearings, but so far no luck. Now I have it in the freezer and will try that next, maybe I can heat the bearings somehow while the crank is still cold. Any advice on getting the rear and center bearings off the crank without damage?
Once these are off I will freeze the crank and heat the bearings and install the bearings pressing on the inner races on with a suitably sized socket. I assume the best way to get the whole works back into the case is to again freeze the crank along with the rear and center bearings, heat the case and install quickly...then install the frozen front bearing after heating the whole works. Sound OK?
03-17-2014, 01:00 PM
My Feedback: (11)
Join Date: Dec 2003
Location: Sacramento,
CA
Posts: 16
Likes: 0
Received 0 Likes
on
0 Posts
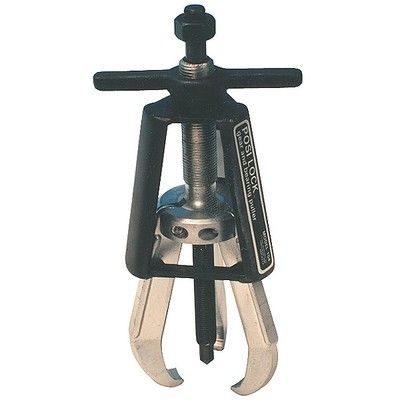
Also I was able to get the prop driver off using a two-jaw puller. Someone had recommended using heat for this, and they were very right...I put some tension on the puller and nothing happened. I put the torch to the aluminum prop driver, working the flame around the exterior, and it popped right off.
03-17-2014, 02:45 PM
Senior Member

Since you are not re-using the bearings you can use a puller & a bearing adaptor.
I wouldn't try to remove the aluminum in the bore W/abrasives. Perhaps Kroil would loosen it up. There are also chemicals for removing metal fouling from rifle bores that might work. The chrome plating in the bores should be impervious to most chemicals.
Instal the front bearing 1st to guide the crank as you seat the rear bearing.
Freeze the crank, warm the middle bearing to 300�F & slip it on. use a small brass or aluminum punch around the inner race to assure the bearing is seated. Freeze the crank/bearing.
Freeze the front bearing, heat the case to 300�F & slip the bearing in. Use your small soft metal puch around the outer race to assure the bearing is seated. Immediately remove the crank/rear bearing from the freezer & slip it into the still warm case. Seat the rear bearing before the temperatures normalize. Use the small brass or aluminum punch around the outer race to assure the rear bearing is seated.
Clear paint on the cases is likely to yellow or discolor. Use VHT flat aluminum engine paint. Harley Davidson flat aliminum case paint is the best.
Last edited by SrTelemaster150; 03-17-2014 at 02:49 PM.
03-17-2014, 04:37 PM
My Feedback: (11)
Join Date: Dec 2003
Location: Sacramento,
CA
Posts: 16
Likes: 0
Received 0 Likes
on
0 Posts
Thanks again, Senior...
I got the bearings off the crank without doing any damage, and cleaned up the case. I ended up trying some Demon-Clean - that stuff works awesome!! Forget the Crock Pot. Holy crap, this thing is clean. I'm not even going to bother with blasting or painting. The only bummer is that it loosened up the Saito badges on the top of the engine. I can always epoxy them back on. Actually, I've never cared for the gold colored badges anyway...
I cleaned up the crank using a bit of WD-40 and 0000 steel wool, no traces of rust on any of the journals. It looks great. Scrubbed it off using solvent and oiled it to stop it from rusting. Next step is to clean up the aluminum on that one bore. I am going to try a bit of muriatic acid - it should dissolve the aluminum and leave the chrome alone. Google helped me out with that one.
I put in a call to Horizon and lo and behold, they actually called back to get some more information to pass on to the engine guy - great service so far. Now all I need are pistons and gaskets and I'll be good to go.
I wish there was a source for the pushrod "seals", which are just some kind of rubber or silicone tubing. There's nothing exotic about it other than the size. Mine is in pretty good shape but it would be nice to freshen it up.
03-17-2014, 05:26 PM

I found a battery post puller comes in handy in most prop flange removals. Had this from my Auto Mechanic days and it is now in my engine rebuild tools drawer, (along with lots of different spacers to help bearings go in straight).
I would avoid using a torch and limit the source to a heat gun. IMO this would prevent distorting or altering the temper of the alloy.
On the subject of crock pots, I found one at a resale shop for $8 and have used this with straight glycol for years. Rarely has any additional cleaning been necessary as the parts come out perfectly clean. I strain the glycol back into the container through a stainless coffee filter. Sometimes takes a while.
03-17-2014, 05:37 PM
Senior Member
As long as the PR tube seals aren't cracked, they will suffice.
03-17-2014, 05:44 PM
Senior Member
I found a battery post puller comes in handy in most prop flange removals. Had this from my Auto Mechanic days and it is now in my engine rebuild tools drawer, (along with lots of different spacers to help bearings go in straight).
I would avoid using a torch and limit the source to a heat gun. IMO this would prevent distorting or altering the temper of the alloy.
On the subject of crock pots, I found one at a resale shop for $8 and have used this with straight glycol for years. Rarely has any additional cleaning been necessary as the parts come out perfectly clean. I strain the glycol back into the container through a stainless coffee filter. Sometimes takes a while.
I would avoid using a torch and limit the source to a heat gun. IMO this would prevent distorting or altering the temper of the alloy.
On the subject of crock pots, I found one at a resale shop for $8 and have used this with straight glycol for years. Rarely has any additional cleaning been necessary as the parts come out perfectly clean. I strain the glycol back into the container through a stainless coffee filter. Sometimes takes a while.
I use this.
 03-17-2014, 06:15 PM
My Feedback: (3)
I worked my way through undergraduate school as a part time mechanic and use something very similar to that, but I knew it as a wheel/gear puller.
03-17-2014, 06:35 PM
My Feedback: (11)
Join Date: Dec 2003
Location: Sacramento,
CA
Posts: 16
Likes: 0
Received 0 Likes
on
0 Posts
Now THAT is a puller! I used a cheap stamped steel one and it worked fine...along with heat.
I tried the muriatic acid trick, applied with a Q-tip, to the aluminum bits stuck to the cylinder bore. The acid foamed up and the aluminum "disappeared" within two minutes. No damage to the bore. Nice!
Also got the crank reinstalled along with the center and front bearings. Now I just need pistons and gaskets and the rest of the reassembly can commence.
03-18-2014, 03:42 AM
Senior Member
Now THAT is a puller! I used a cheap stamped steel one and it worked fine...along with heat.
I tried the muriatic acid trick, applied with a Q-tip, to the aluminum bits stuck to the cylinder bore. The acid foamed up and the aluminum "disappeared" within two minutes. No damage to the bore. Nice!
Also got the crank reinstalled along with the center and front bearings. Now I just need pistons and gaskets and the rest of the reassembly can commence.
I tried the muriatic acid trick, applied with a Q-tip, to the aluminum bits stuck to the cylinder bore. The acid foamed up and the aluminum "disappeared" within two minutes. No damage to the bore. Nice!
Also got the crank reinstalled along with the center and front bearings. Now I just need pistons and gaskets and the rest of the reassembly can commence.
Of course you may want the higher compression if the compression height is taller. In that case you can check the piston/valve clearance & leave the shims out if everything clears.
03-25-2014, 07:22 PM
Senior Member
Join Date: Jul 2004
Location: Arkansas city,
KS
Posts: 141
Likes: 0
Received 0 Likes
on
0 Posts
I rebuilt one of my saito's awhile back and hh was out of stock on the rubber boots for the push rod tubes so I used large silicone fuel tubing !!! It worked great. Glad I had polished the brass.
03-26-2014, 05:36 AM
Senior Member
From the looks of things, finding a secure place to mount the hall sensor might be a challenge. I'm thinking facing the sensor forward W/the magnet in the back of the hub ring might be a good route to go.
Either that or a 2 piece mount to clamp onto the front of the crankcase nose.
03-26-2014, 03:03 PM
Senior Member
Join Date: Apr 2010
Location: Cairns, AUSTRALIA
Posts: 1,053
Likes: 0
Received 0 Likes
on
0 Posts
Moving is challenging but rebuilding a workshop from a green fields position is more so but re finding lost treasures is great. Off to the model a/c races today. We totalled our mount in testing. Light a/c massive power resulted in a pile of balsa (torque roll on t/o) but fortunately all the mechanicals including the engine and prop are still intact. Watch out for the reports on the event (Gratton Spectrum) in the magazines in the future. We have got good coverage from the pommie mags in the past and look forward to same this year.
03-26-2014, 09:35 PM
My Feedback: (3)
Moving is challenging but rebuilding a workshop from a green fields position is more so but re finding lost treasures is great. Off to the model a/c races today. We totalled our mount in testing. Light a/c massive power resulted in a pile of balsa (torque roll on t/o) but fortunately all the mechanicals including the engine and prop are still intact. Watch out for the reports on the event (Gratton Spectrum) in the magazines in the future. We have got good coverage from the pommie mags in the past and look forward to same this year.
I don't think I have ever seen a model torque roll on take off!
The closest I ever saw was the hard turn my .19 sized HOB P-51 did when I hammered the OS .32ABC! That got their attention!
Oh, good luck on the recovery.
Last edited by Jim Branaum; 03-26-2014 at 09:38 PM.
03-27-2014, 02:26 AM

Jim i think you'll find he runs big dia props and i'm betting it was a 65??
Fnq do they limit rudder and aileron tabs (not trim tabs) and are you allowed to run full throws and a bit more expo?? sounds like you might need some stick time on an overpowered midget mustang yes?
ps good luck setting up the workshop
Fnq do they limit rudder and aileron tabs (not trim tabs) and are you allowed to run full throws and a bit more expo?? sounds like you might need some stick time on an overpowered midget mustang yes?
ps good luck setting up the workshop
Last edited by Rudolph Hart; 03-27-2014 at 02:27 AM. Reason: more bs
03-27-2014, 01:22 PM

I'm not aware of anyone doing it yet.
From the looks of things, finding a secure place to mount the hall sensor might be a challenge. I'm thinking facing the sensor forward W/the magnet in the back of the hub ring might be a good route to go.
Either that or a 2 piece mount to clamp onto the front of the crankcase nose.
From the looks of things, finding a secure place to mount the hall sensor might be a challenge. I'm thinking facing the sensor forward W/the magnet in the back of the hub ring might be a good route to go.
Either that or a 2 piece mount to clamp onto the front of the crankcase nose.
Thanks very much for the reply. I think you are right. I will look around the work area & see what I can come up with. No hurry...its snowing here today!
03-28-2014, 02:06 PM
Well, it finally got warm enough to bench run my Saito 91S to break it in. I broke it in based on the suggestions in this forum. It was quite easy. I used Rich's Brew 20/20 all synthetic fuel, Master Airscrew 15x6 S2 type (scimitar), and an old glowplug with idle bar. I also use a Turboheader muffler since I bought the engine without a stock muffler. At the end of the break-in sequence, I tached it at WOT, I got a whopping 9500 rpms even when slightly rich. So, I am happy with the performance. Throttle response is also tremendous.
03-28-2014, 02:46 PM
Senior Member
Join Date: Apr 2010
Location: Cairns, AUSTRALIA
Posts: 1,053
Likes: 0
Received 0 Likes
on
0 Posts
On the racing, scratch one Graupner Sea Fury, one of the club members leading the race for 120 class got cleaned up by an idiot cutting pylons, very spectacular, mechanicals in tact but a/frame totalled. On our a/c, it was powered by an OS 120 AX on steroids. It was a modified Edge with a 16 x8 or x10 prop on board. Held on the ground to long and with a 3/4 to max throttle t/o it became an arm full for the driver. Next year we will be better prepared. However the races have become a closed event due to the rain and racing ranging from foamie FMC T28's through the full card of events is still going on and will do so tomorrow (Sunday) as the carnage continues.
Bright point none of my Saitos are running models and engines sitting in my new soon to become shed / workshop covered by other models and bits and pieces.
The only good thing about our racing model was that the whole thing less battery cost only AUD 200, it had new AR 9000 r/x, new OS 120, all new digital JR servos and a virtually unflown a/frame. No comments we know it was a steal and the bits will for the basis of the new racer (maybe)
04-05-2014, 02:00 PM
Senior Member
Join Date: Apr 2010
Location: Cairns, AUSTRALIA
Posts: 1,053
Likes: 0
Received 0 Likes
on
0 Posts
Last update on the Gratton do. The event became a closed event due to rain, thus only for flyers. Won't bore you with details EXCEPT that the 120 class will now be expanded to include 4 strokes and gas engines of the same capacity. Weight restrictions have been / will be removed but all models will have to have a heavy a/c certificate regardless of weight. New racer for this class will be a Beech Staggerwing. I can hear the laughing but when I add in that it will have fixed u/c and will be scale please don't fall out of your collective seats. Check out the Beech a/c museum site and look at the pretty red staggerwing. Walter Beech actualy raced a red and gold version (with great success) with fixed u/c in the 30's. It will get a worked Saito 120. More later
04-05-2014, 02:04 PM
Senior Member
Join Date: Apr 2010
Location: Cairns, AUSTRALIA
Posts: 1,053
Likes: 0
Received 0 Likes
on
0 Posts
Another point that arose from the w/end. The other day we were testing a 62 for the Canowindra event and the b****y thing would not run at any rpm except full throttle. Nothing done at the field would fix it so it was put in the corner in disgrace. Long story short, we found a celluose build up in the spray bar / needle area. I had this once before in Malaysia and after much discussion etc we finally found a crack in the neck of the fuel bottle. The high humidity after the rain had resulted in moisture build up in the fuel the rest is now history as are the weeds are my mates w/shop.
04-05-2014, 02:38 PM
My Feedback: (89)
Join Date: May 2003
Location: Oklahoma City, OK
Posts: 281
Likes: 0
Received 0 Likes
on
0 Posts
I'm not aware of anyone doing it yet.
From the looks of things, finding a secure place to mount the hall sensor might be a challenge. I'm thinking facing the sensor forward W/the magnet in the back of the hub ring might be a good route to go.
Either that or a 2 piece mount to clamp onto the front of the crankcase nose.
From the looks of things, finding a secure place to mount the hall sensor might be a challenge. I'm thinking facing the sensor forward W/the magnet in the back of the hub ring might be a good route to go.
Either that or a 2 piece mount to clamp onto the front of the crankcase nose.
Regards, Ken AMA 1528