


Welcome to Club SAITO !
 11-25-2008, 08:51 PM

You can also jam a hobby knife blade or razor blade into the gear teeth at the edge of the cam box on some of the engines but the 100 is not this handy because there are no sides on the cam cover like on the 91
 11-26-2008, 07:40 AM
Senior Member
My Feedback: (11)
Join Date: Mar 2003
Location: South Lyon,
MI
Posts: 560
Likes: 0
Received 0 Likes
on
0 Posts
Has anyone ever made an extended exhaust header? I'm in the process of experimenting with a 3/8" chrome plated toilet supply line, some M12x1.00 brake line fittings and a flaring tool. My concern is that I'll be tightening the fittings against the head instead of using a lock nut. My thought was to make a small gasket from brass shim stock to tighten against. I'm also concerned with the durability of the copper tubing.
Any thoughts?
BTW, this is for one of my 100's
I've also owned a 72 and a 91. Am I in the club?
Any thoughts?
BTW, this is for one of my 100's
I've also owned a 72 and a 91. Am I in the club?
11-26-2008, 08:41 AM

My Feedback: (5)
Join Date: Nov 2002
Location: Hernando,
FL
Posts: 53
Likes: 0
Received 0 Likes
on
0 Posts
Thank's everyone, I should have looked harder before removing the cam assembly for marks. I thought from past experiance that there would have been alignment marks on both gears, but after removing the crank shaft there was not any such mark. So just a quick cap on procedure find top dead center and install the cam gear with alignment mark at 6:00 (straight down) against crank. Why don't engine manufactures use material like stainless steel for bearings or even ceramic bearings? I would gladly pay $5 to $10 more if I never had to replace rusty bearings. I have a short story about this circumstance I would like to share, this maybe of help down the road for some. This Saito is approx 5 years old and during the first year of service I had a RX problem which led to a nose in on a Ultra stick 60. I sent all radio gear back to Horizon for a complete inspection as well as the Saito, it seemed fine but just wanted to be sure. They sent everything back to me and a new Ulta Stick to boot, they found a break in the antenna wire, at no charge to me, GREAT I love Horizon. They also stated they disassembled the Saito and checked for a bent cranck and replaced the bearings when they had it apart, no charge GREAT. This engine was stored in the original box sent back to me 5 years ago, never ran since that time. Last week I dug out that engine to mount on a new H-9 plane and it was seized up. I then took off the end cap to find the large bearing all rusty and crappy looking, defenitly not new bearings as described in the repair invoice from Horizon, I guess as I type this I'm alittle upset with Horizon, but they did not charge in the first place, They just should not of said they replaced with new parts. Guy's to make my point, I quess we are all at someone's mercy when we ask for a service to be rendered on any type of equipment, just make sure you all double check what you have actually paid for, don't assume.
Thanks,
Dan.
Thanks,
Dan.
11-26-2008, 09:11 AM
Senior Member
Had a crash radio failure of some sort or battery or dual battery switch whatever which made a vertical dive full tilt and buried plane into thick mud and plane is DOA
Prop broke on the way in and bent push rod cover and probably the push rod
Engine is the Saito 180 2007 model just run in with 5 gallons and was all sorted out and working great
Cleaned off all the mud carefully and don't think any got into the engine
Have new push rods and push rod covers on order
How do I extract the one cover and push rod ????
I removed the cam cover and the timing nuts
I removed the bolts that hold on the cam cover at the bottom( with great difficulty and had to recut the allen several times after it stripped )
The pushrod covers don't seem to unscrew or unthread or push up or down
The screws that hold the rocker on wont come loose to get cam rockers out of the way if the cover slide up and out
can I apply heat to the roker arm unit make these screws lossen up or will that risk to distort the head
The big bolts that hold on the cyclinder head wont unscrew and reefed my allen keys several times even with cutting of the broken part of the allen key
Should or could I use heat from my gas solder machine which has a two inch flame very hot flame and can solder silver and heat allen keys or will that distort the engine casing
Or if I can get the rockers off can I extract the rocker rods and rocker covers without taking the cyclinder apart
Stumped wasnt expecting bolts to be so stubborn
Was hoping never to have to rebuild engine but thats modeling for you
Should I use any special nut lock glues when reassembling engine
Balsaeater
11-26-2008, 06:00 PM
Senior Member
ORIGINAL: Hobbsy
BE, you need to unbolt the cylinder at its base and raise it up off of the pushrod covers.
BE, you need to unbolt the cylinder at its base and raise it up off of the pushrod covers.
I suspected that was the way to do it
Now how to get those allen bolts to turn is the problem
Must have been the Saito factory gorrila that tightened them
thanks
Balsaeater
11-26-2008, 09:17 PM
Junior Member

Join Date: Oct 2008
Location: kingston,
ON, CANADA
Posts: 17
Likes: 0
Received 0 Likes
on
0 Posts
Balsaeater I juspect that you are using small allan key's and hopefully not from off shore manufacture...I had the same prob.. untill I smarten up and purchased top off the line tee handel key's that were made in U.S.A.,Canada ,U.K or Germany ...I suggest you start with a good allan tee handel set ..most of the screws on the saito heads are 2.5mm and the handel has to be at least 5'' long to clear the top..of the cylinder. you can obtain twice the pressure on the screw with a tee handel.. However I agree that the factory shur puts the beef to them little screw's ..I personnely would not attempt useing heat... any where on a fully assembled engine
11-26-2008, 09:28 PM

My Feedback: (102)

Join Date: Dec 2001
Location: Colonial Beach, VA
Posts: 20,370
Likes: 0
Received 25 Likes
on
25 Posts
You can't get a T handle wrench on those unless they are ball drivers. I used a Craftsman allen wrench that had been cut down so it would go straight in. I have several I've cut down for such purposes.
11-26-2008, 11:43 PM


Join Date: Oct 2006
Location: Englewood, FL
Posts: 324
Likes: 0
Received 0 Likes
on
0 Posts
Hi Everyone,
I just wanted to say that Club Saito is #1 is my book. The 3-4 experienced folks that seem to help everyone are the greatest!
I was having huge problems with my Saito 72 - no matter how hard I and the experienced guys at my Club in Michigan tried, we could just not get it run reliably.
In steps Hobbsy - responding to my 'cries for help' post. Guess what? He not only analyses what the problem is with my engine but comes up with ways to increase it performance and extend it's useful life through proper care and storage!
What more could a guy ask for?
I am a complete stranger to Hobbys but he went far out of his way, much more than I ever expected, to lend me a hand and solve the problem.
I now have one great running Saito!
All I can say is BRAVO!!!!
I am in your debt and Thanks again!
Ken Cz -
11-27-2008, 02:35 AM
Senior Member
I was monertoring another thread about removing a sticky bearing froma YS engine and in that thread they were placing the engine casing in a oven at ~300C for ~20 minutes .
I was from this thinking can I do similar and place all the engine in the oven minus the plastic parts on the carb and shield the rubber on the rocker covers with silver paper to help loosen up the Allen key bolts or would that too risky
Balsaeater
I was from this thinking can I do similar and place all the engine in the oven minus the plastic parts on the carb and shield the rubber on the rocker covers with silver paper to help loosen up the Allen key bolts or would that too risky
Balsaeater
11-27-2008, 07:54 AM
My Feedback: (102)
Join Date: Dec 2001
Location: Colonial Beach, VA
Posts: 20,370
Likes: 0
Received 25 Likes
on
25 Posts
Glad to help Ken, I welcome any chance to tinker, although I try to do it scientifically, you know the old saying, "the greatest prerequesite to intelligent tinkering is to save all the pieces."
11-27-2008, 09:10 AM
Senior Member
Possibly I mistook 300F for 300C as I tend to forget that anybody still uses that form of temp measure.
Anyway I will try some new allen keys I bought and hopefully wont have to heat engine
Keep you posted
Balsaeater
11-27-2008, 11:08 AM
Junior Member
Join Date: Oct 2008
Location: kingston,
ON, CANADA
Posts: 17
Likes: 0
Received 0 Likes
on
0 Posts
With regards to my input on allan tee handel set's,, Hobbsy is definitely write, the set that I have are infact ball wrench end's however the angle ofset is such that with the rocker cover off they are almost stright in line with the screw (never had a problem )just keep a down pressure and torque on and you will hear a snap and the screw will dislodge...he also has a good answer with the cut off good quality key wrench that can get the high torque required...cheers Goforit.
11-27-2008, 01:21 PM
Senior Member
Join Date: Nov 2002
Location: Lake Cowichan,
BC, CANADA
Posts: 1,341
Likes: 0
Received 1 Like
on
1 Post
Hello Balsaeater; You can get vise grips on the side of the cylinder hold down screws, clamp them down tight then loosen them off. They oly have to move a little to get them started.
11-27-2008, 10:16 PM
Senior Member

This is an access hole for holding the cam still when re-assembling?
Is there a plug in there that comes out, or does one screw the plug in to press against the cam shaft?
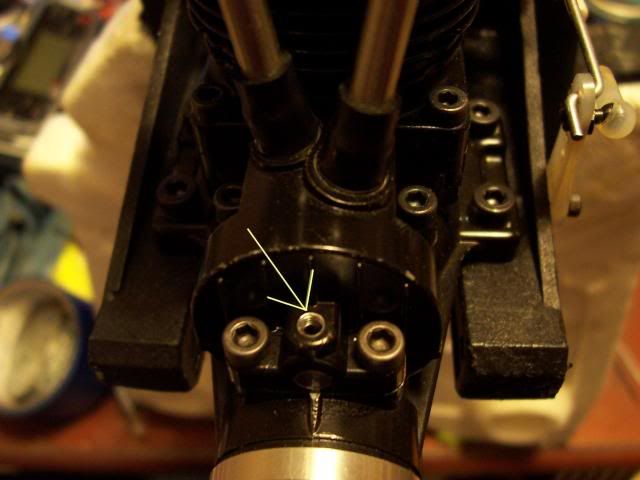
Is there a plug in there that comes out, or does one screw the plug in to press against the cam shaft?
11-27-2008, 10:35 PM
There is a tiny set screw in the hole at all times that keeps the pivot shaft of the cam from turning. It must be kept tight unless you want to remove the pivot shaft of the cam and the cam itself.
11-27-2008, 10:38 PM
The access hole for locating the cam at assembly on this engine is to remove the intake valve lifter and use the small end of a pushrod stuck into the cam oil hole which will lock the cam into a position with the index dot at 6 O'clock
Notice the oil hole in the Saito cam in the picture

Notice the oil hole in the Saito cam in the picture
11-27-2008, 10:54 PM
A picture of the cam pivot shaft. Notice the flat where the set screw you saw from the outside seats and holds the shaft in place. The newer shafts have a groove between the flat and the very end for a skinny Oring.

 11-28-2008, 12:25 AM
I must add for others at this point that Saito engines of the large frame style like the 120, 150, 180, 220, 300, and 450 have mushroom lifters. You cannot remove a lifter from the outside. The cam must be removed from the cam box and the lifter removed from the inside.
Therefore when installing the cam, one must use a knife blade jammed into the cam gear teeth at the edge of the cam cover to locate the cam with the timing dimple in the correct position.
Therefore when installing the cam, one must use a knife blade jammed into the cam gear teeth at the edge of the cam cover to locate the cam with the timing dimple in the correct position.
11-28-2008, 11:30 AM
Senior Member
Thanks guys got the allen bolts to undo
Bought a hardened Allen key and cut it to size .I then used a long nose plyers and ordinary plyers depending who could fit to help for the turning with the allen key and got them to budge .
Now I will leave it aside until the replacement parts arrive next week and study the info for the rebuild
On the rebuild the Allen bolts will be made with flat sides so as to allow a spanner to help undo them
chow 4 now
Balsaeater
11-28-2008, 03:21 PM
My Feedback: (5)
Join Date: Nov 2002
Location: Hernando,
FL
Posts: 53
Likes: 0
Received 0 Likes
on
0 Posts
Hello W8ye,
Thanks for the cut photo, you can plainly see the timming mark on the crank on the cut-a-way photo on the 56. But they did not mark the 100 like that. But thanks to your help it will not be hard to get top dead center and then have the mark on the cam gear at 6:00. Dan.
Thanks for the cut photo, you can plainly see the timming mark on the crank on the cut-a-way photo on the 56. But they did not mark the 100 like that. But thanks to your help it will not be hard to get top dead center and then have the mark on the cam gear at 6:00. Dan.