


Welcome to Club SAITO !


 03-08-2011, 04:00 AM


Hi i'm missunderstanding a basic thing here.With wear on pushrod ends and cam followers etc the gap re tappet clearance should open or be wider as we say down here.I still think the low speed needle is wrong
03-08-2011, 04:21 AM
Senior Member

Join Date: Jan 2005
Location: Melbourne, AUSTRALIA
Posts: 962
Likes: 0
Received 0 Likes
on
0 Posts
ORIGINAL: Old Fart
Hi i'm missunderstanding a basic thing here.With wear on pushrod ends and cam followers etc the gap re tappet clearance should open or be wider as we say down here.I still think the low speed needle is wrong
Hi i'm missunderstanding a basic thing here.With wear on pushrod ends and cam followers etc the gap re tappet clearance should open or be wider as we say down here.I still think the low speed needle is wrong
That's true, but you'll also see some valve seat wear/recession which can offset the widing gap. It's all theoretical until someone scientifically monitors it over time.
With most glow engines, adjust the low speed needle as a last resort. Most tuning problems start when the low end is tweaked. Also, it's best not to tweak the low end (if possible) until the engine is run in. I've had plenty of new engines (not necessarily Saito) that have transition problems which magically subside as the engine runs in. Resist the temptation to tweak...
OS AX engines are one example....leave the low end alone and live with the transition problems, it will go away as the engine runs in.
Inverted four stroke engines are another story...probably best to set the high end and then come back to sort out the low end and transition.
03-08-2011, 07:28 AM

I finally got the proper front bearing for my Saito 65. I have the front one installed but I'm having a terrible time installing the rear bearing. I heated the case with with a heat gun, put the rear bearing in place and tried to use a wooden block and hammer to drive it in place. I got it in part way but that's it. Is there an easier/better way to do this?
Also, the rear bearing has a plastic type spacer that seperates the steel balls and is more open on one side. Is there a prefered direction to install this?
Also, the rear bearing has a plastic type spacer that seperates the steel balls and is more open on one side. Is there a prefered direction to install this?
03-08-2011, 07:54 AM

My Feedback: (102)

Join Date: Dec 2001
Location: Colonial Beach, VA
Posts: 20,370
Likes: 0
Received 25 Likes
on
25 Posts
With a Saito you can safely set the LS screw after the first 10 minutes of running it rich at 4,000 rpm. Running it in will change the LS setting very little if any. It's important to set the LS needle with the HS needle at absolute peak or you'll end up chasing the LS needle setting forever.
03-08-2011, 09:57 AM
Junior Member
Join Date: Dec 2010
Location: Watertown,
MA
Posts: 2
Likes: 0
Received 0 Likes
on
0 Posts
I'm looking for a 90 degree exhaust adaptor for the 40a like they have for larger engines. Two 45 deg pieces would fit inside the cowl of a WM Zen 30 but would have to be shortened and not have enough thread left for the locknuts. Any ideas? I've been running this engine on an old Kadet MK2, it's a great little engine.
 03-08-2011, 12:47 PM
The main bearing is in the freezer. Front bearing is already installed. Had I know the rear bearing would be so difficult to install I would have put that one in first. I fear heating the crankcase in the oven now may hurt the rubber sealed front bearing so I'll use a heat gun to heat it.
03-08-2011, 03:43 PM
Senior Member
Join Date: Apr 2010
Location: Cairns, AUSTRALIA
Posts: 1,053
Likes: 0
Received 0 Likes
on
0 Posts
Re the rear bearing installation. I know this is heresay but what I do when I don't have my u bueat specially designed drift (that loks like a crank shaft sort off is put the rear bearing on the crank shaft make sure it is bedded correctly then after warming the crank case with my covering heat gun is introduce the crankshaft to the crank case (from the rear push it in as far as I can by hand and then if necessary apply a precussive force (hammer) via a wooden drift to drive ith crankshaft home the last remaining bit. Make sure the drift is in the centre of the shaft and give it a good hit, more hits means more potential for damage or misalignment. It usually takes me 2 hits plus a couple of taps to get it all right.
I use a 2 pound ball pien hammer for this exersise if that is any guide and I haven't had an engine fail because of it yet.
I use a 2 pound ball pien hammer for this exersise if that is any guide and I haven't had an engine fail because of it yet.
03-08-2011, 05:29 PM

My Feedback: (30)
Join Date: Jan 2011
Location: Houston, TX
Posts: 113
Likes: 0
Received 0 Likes
on
0 Posts
Have you seen these 90° adapters? http://www.rcuniverse.com/market/item.cfm?itemId=724304
That might work along with a straight threaded manifold.
That might work along with a straight threaded manifold.
03-08-2011, 05:48 PM
Senior Member
Join Date: Apr 2010
Location: Cairns, AUSTRALIA
Posts: 1,053
Likes: 0
Received 0 Likes
on
0 Posts
A question to all, why are you guys usin OS F plugs when Saito makes really good ones (at the same price here in OZ / wet FNQ)
03-09-2011, 03:04 AM
ORIGINAL: FNQFLYER
Re the rear bearing installation. I know this is heresay but what I do when I don't have my u bueat specially designed drift (that loks like a crank shaft sort off is put the rear bearing on the crank shaft make sure it is bedded correctly then after warming the crank case with my covering heat gun is introduce the crankshaft to the crank case (from the rear push it in as far as I can by hand and then if necessary apply a precussive force (hammer) via a wooden drift to drive ith crankshaft home the last remaining bit. Make sure the drift is in the centre of the shaft and give it a good hit, more hits means more potential for damage or misalignment. It usually takes me 2 hits plus a couple of taps to get it all right.
I use a 2 pound ball pien hammer for this exersise if that is any guide and I haven't had an engine fail because of it yet.
at least try the plastic or rubber hammer once before you die
03-09-2011, 04:36 AM

I normally use a brass hammer to seat the bearings with. I have several different weights or sizes. Including the BFBH model shown here.
Fortunately, I haven't had to resort to using this big one yet on model airplane engines a smaller brass hammer works fine.
If you use a steel hammer, there is some risk that the bearing races may crack on you.

Fortunately, I haven't had to resort to using this big one yet on model airplane engines a smaller brass hammer works fine.
If you use a steel hammer, there is some risk that the bearing races may crack on you.
03-09-2011, 05:23 AM
Senior Member
Join Date: Jul 2006
Location: Maryborough Queensland, AUSTRALIA
Posts: 261
Likes: 0
Received 0 Likes
on
0 Posts
ORIGINAL: Old Fart
A two pound steel hammer?? you rough *******,all my respect you have so carefully built up has just been taken away(sob)at least try the plastic or rubber hammer once before you die
ORIGINAL: FNQFLYER
Re the rear bearing installation. I know this is heresay but what I do when I don't have my u bueat specially designed drift (that loks like a crank shaft sort off is put the rear bearing on the crank shaft make sure it is bedded correctly then after warming the crank case with my covering heat gun is introduce the crankshaft to the crank case (from the rear push it in as far as I can by hand and then if necessary apply a precussive force (hammer) via a wooden drift to drive ith crankshaft home the last remaining bit. Make sure the drift is in the centre of the shaft and give it a good hit, more hits means more potential for damage or misalignment. It usually takes me 2 hits plus a couple of taps to get it all right.
I use a 2 pound ball pien hammer for this exersise if that is any guide and I haven't had an engine fail because of it yet.
Re the rear bearing installation. I know this is heresay but what I do when I don't have my u bueat specially designed drift (that loks like a crank shaft sort off is put the rear bearing on the crank shaft make sure it is bedded correctly then after warming the crank case with my covering heat gun is introduce the crankshaft to the crank case (from the rear push it in as far as I can by hand and then if necessary apply a precussive force (hammer) via a wooden drift to drive ith crankshaft home the last remaining bit. Make sure the drift is in the centre of the shaft and give it a good hit, more hits means more potential for damage or misalignment. It usually takes me 2 hits plus a couple of taps to get it all right.
I use a 2 pound ball pien hammer for this exersise if that is any guide and I haven't had an engine fail because of it yet.
at least try the plastic or rubber hammer once before you die
I have never encountered a "clean" Saito case rear bearing bore sufficiently heated for easy fit assembly damaging or destroying a front bearings seal previously fitted,let alone doing damage to a bearing before its life started.
 03-09-2011, 05:27 AM
Senior Member
Join Date: Jul 2006
Location: Maryborough Queensland, AUSTRALIA
Posts: 261
Likes: 0
Received 0 Likes
on
0 Posts
ORIGINAL: earlwb
I normally use a brass hammer to seat the bearings with. I have several different weights or sizes. Including the BFBH model shown here.
Fortunately, I haven't had to resort to using this big one yet on model airplane engines a smaller brass hammer works fine.
If you use a steel hammer, there is some risk that the bearing races may crack on you.
[img][/img]

(see pic above)
03-09-2011, 05:39 AM
I stay away from the hammer on assembly after experience peening some races on stainless bearings.
If the bearing needs a little nudge, I use a arbor press
If the bearing needs a little nudge, I use a arbor press
03-09-2011, 05:54 AM
My Feedback: (30)
Join Date: Jan 2011
Location: Houston, TX
Posts: 113
Likes: 0
Received 0 Likes
on
0 Posts
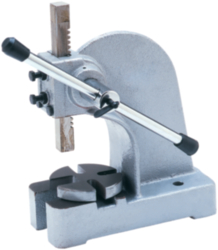
The proper way to install a bearing is a press. If heating the housing and cooling the bearing do not work for assembly, the best way is to use an arbor press.
With any method, it is best to only press/tap on the outer race of the bearing. This can be accomplished by using a rod slightly smaller than the bearing with a hole drilled in the end slightly larger than the inner race.
I know not everyone has one of these laying around (me included), but they are in any machine or automotive shop and most guys would install a bearing for you for nothing. I am going to get one one of these days, they have a lot of uses:
 03-09-2011, 06:36 AM
For what it's worth, I did manage to get the rear bearing in my Saito 65. Even with the bearing in the freezer and the case heated it was a real bit$h. I've replaced several bearings in 2 strokes before, but none were as difficult as this one. Now that it's in, it seems to have a little bit more resistance to turn. Hopefully once I run it in again it will get better.
03-09-2011, 07:02 AM
ORIGINAL: rickbrad
The proper way to install a bearing is a press. If heating the housing and cooling the bearing do not work for assembly, the best way is to use an arbor press.
With any method, it is best to only press/tap on the outer race of the bearing. This can be accomplished by using a rod slightly smaller than the bearing with a hole drilled in the end slightly larger than the inner race.
I know not everyone has one of these laying around (me included), but they are in any machine or automotive shop and most guys would install a bearing for you for nothing. I am going to get one one of these days, they have a lot of uses:
03-09-2011, 07:29 AM
My Feedback: (30)
Join Date: Jan 2011
Location: Houston, TX
Posts: 113
Likes: 0
Received 0 Likes
on
0 Posts
Nice. I want one.
I just checked and you can get the cheapie little Chinese ones from Harbor Freight Tools for around $50 or less for the really small one. They probably wouldn't be great for industrial use but I think would be fine for a hobbyist.
I just checked and you can get the cheapie little Chinese ones from Harbor Freight Tools for around $50 or less for the really small one. They probably wouldn't be great for industrial use but I think would be fine for a hobbyist.
03-09-2011, 07:55 AM
This is the one I have and it has been very satisfactory for model engine bearings
http://www.harborfreight.com/1-2-hal...ress-3551.html
http://www.harborfreight.com/1-2-hal...ress-3551.html
03-09-2011, 08:05 AM
I'm going to go by Mike's Merchandise today to see if they have an arbor press. I've been wanting one for a long time. Looked at drill press vises yesterday.
Lowe's and Home Depot have wood clothes rods that come in long lengths for a few bucks. These are good for turning down to various diameters to press bearings. The wood is soft enough to size down but hard enough for bearing work.
Lowe's and Home Depot have wood clothes rods that come in long lengths for a few bucks. These are good for turning down to various diameters to press bearings. The wood is soft enough to size down but hard enough for bearing work.