


3W Bearcat with Moki 300
 12-22-2014, 08:57 AM
#1

Thread Starter

I'm just starting a 3w Bearcat build and will be putting a moki 300 in it. From what I've been reading on here most have a 250. I was curious as to the ground clearance you have with a 2 blade 30" or 32" prop? I'll be installing Sierra retracts with Robart 5.5" wheel. I have some options for a scale 4 blade prop/hub but someone had questioned about Prop ground clearance. Solo doesn't have an option for the 300, nor does Biela. So before spending a lot on a custom prop I thought I'd ask the question.
Rob
Rob
 12-22-2014, 02:03 PM
#2

My Feedback: (48)
I suggest you make sure you have the height issue on the retracts solved for prop clearance before proceeding. The Century Jet retracts do not function properly once in the air and Sierra does not make the correct size articulating retracts for the Bearcat. You can extend the legs if scale is non issue and reset location in the wing. Just FYI. Good luck
01-06-2015, 08:02 PM
#4
Thread Starter
I just started working on the Bearcat. since Enrich from Austria isn't making or selling the Bearcat bulkheads at this time. I found this cool little blue flex tool and is 30" long with a lead center and fits curves nice. The photos show how I used it both from outside the fuselage and inside. I then copied on cardboard and fit for the bulk head. As you can see by the cardboard templates, the bulkhead fit fairly tight
.


.
01-08-2015, 01:06 PM
#5
Senior Member
My Feedback: (3)

Join Date: Mar 2002
Location: League City, TX
Posts: 252
Likes: 0
Received 0 Likes
on
0 Posts
Wow a Moki 300. That should be interesting. I presume your going this route purely for scale prop size. Otherwise this engine is gonna be way too much for the designed airframe. 250cc is perfect size, pulls with power to spare.
I'm building the 3W with a RCS/Moki 250 in it myself. There are just a few build threads. Looks like I should create my own.
Shawn

I'm building the 3W with a RCS/Moki 250 in it myself. There are just a few build threads. Looks like I should create my own.
Shawn
Last edited by Shawnusa; 01-08-2015 at 01:15 PM.
01-08-2015, 02:44 PM
#6
Thread Starter
Yeah.. regarding the 300, I was going with the 250 and Gotz from Vogelsang talked me in the the 300. We'll see as well.... But I will be going with a larger scale prop. most with the 250 users are using a 28" solo 4 blade. I'll be going 30" with a high pitch. I could get a 32" but asking a few folks and looking at my bearcat, the ground clearance might be too tight with little or no room for error. SL-Propeller in Germany makes a hub and carbon props for the 300. I ordered a few sets and they're on the way now. Solo does not make anything for the 300. Seidel in Germany also will make a custom scale Bearcat four blade, but I'm waiting to see it the price is just too far out there. I'm looking forward to see your progress as well. I can tell I'm going to have a lot of question on the 3W Bearcat. I'll try to keep posting my progress here.
01-08-2015, 03:07 PM
#7
Thread Starter
Started working on the wings bolts. I'm using two 1/4" steel rods and two 1/4-20 threaded bolts for each wing and then added plywood supports to both the wing roots and inside the fuse that are Aero-Epoxied in place. I have one of the steel rod located at the forward LE. I used 1/4-20 threaded inserts on the wing root. I think it should be plenty strong enough. For the steel rods, I added brass tubing as a liner on the fuselage side so the steel rods slide in really nice. I had to cut out the small servo wire channel that 3W had to feed the wires through on the wings. just too small since I'll have nav-lights and will be running the air lines for the gear through it as well. I added some pictures. If anyone sees anything wrong or have suggestions please let me know. i just thought I'd start adding some build progress since there aren't many 3W build threads. Rob


01-09-2015, 04:56 AM
#8
Senior Member
My Feedback: (3)
Join Date: Mar 2002
Location: League City, TX
Posts: 252
Likes: 0
Received 0 Likes
on
0 Posts
rbgetz,
Looking good. One thing I might recomend is beefing up your gear area. From what I see that will tear out on a bad landing or in a grass pot hole. I have very differnet gear so not sure how to make a recomendation, but with a 50-60 lbs plane and tall gear. Well....Iv'e seen some good planes go bad.
Keep it up... I've been stalling on mine too long.
Shawn
01-20-2015, 06:11 PM
#9
Thread Starter
a little more completed.. I have a lot of spare G-10 dual horns sitting around and will use them for the control surfaces. I'll probably sand down one hole on rudder horn. It has a 4" spread I don't really need that and the second hole will give 3.5" which should be plenty. Also, thanks Shawn for the advice. I've also been working on strengthening the gear area..


 01-20-2015, 07:42 PM
#11
Thread Starter
That's unreal... It's too funny that I was actually just talking with Gotz from Aeroscale last week about Seidel. He was going to check to see if they made the hub for the 300. I just got my prop in from SL-Propeller in Germany today. Same/similar to solo except SL-Prop had the large diameter bore for the 300 and the carbon fiber blades. I went with 30". It looks nice though...


01-20-2015, 09:59 PM
#12
Join Date: May 2007
Location: Snohomish,
WA
Posts: 61
Likes: 0
Received 0 Likes
on
0 Posts
Hello,
Fantastic build you have going here! Great combination!
I am a good friend of Mario Seidels and Gotz V.
Just spoke with Mario last weekend and he is not planning the reduction for any other Mokis right now as he is consumed with testing the current unit. He has thought about building one around the 180 as there was some interest over on his side of the pond, but I dont think this will happen anytime soon.
He and I had to laugh one day when we thought about the prop size this 300 would spin with a reduction.
You should check out his web page to see his scale props he can build for the Cat, if you haven't already...
...any how, glad to find your build, I will be very interested to see this bad boy go!
John
01-21-2015, 07:49 PM
#13
Thread Starter
Hey John,
I checked out the Seidel website. Really nice scale props. A real Craftsman... Gotz V. had also sent me some photos of his work. For the first flight I ordered a SEP 29/20 4-blade. With the bearcat I'm really limited by prop clearance especially when that thrust line is parallel to the ground. I think anything greater then a 30" would be leave little room for error. I really can't even use a 2-blade. The prop I used on the test bench is a 2-blade 34/14.
I hope to have it ready by March-April time.
01-24-2015, 08:26 PM
#14
Thread Starter
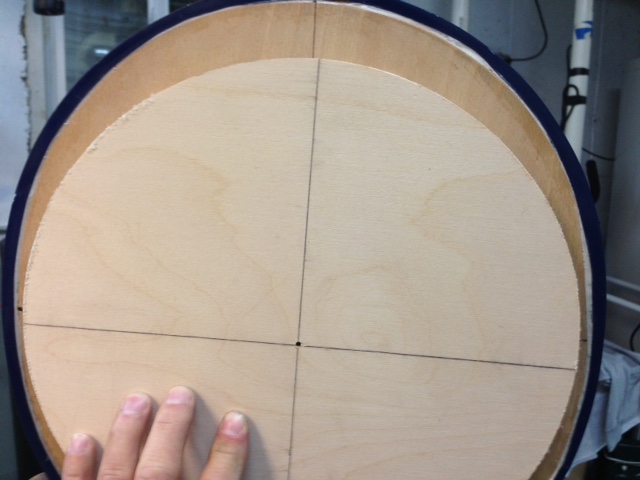
I'm really surprised that the firewall that came with the kit was so thin. only 1/8". it also had a lot of flex. so before I start to build the engine mount, I decided to support the existing firewall on the inside with another 1/4" plywood. I used my favorite circle temple for my router to match the existing inside diameter. I then cut the new support firewall and epoxied to the exiting firewall and then a bead of Aeroepoxy on the inside edge. I can now literally grab the firewall with both hands and shake the whole air frame. Solid. I'll then start the engine mount with a 1/2" ply bolted to the new firewall.


02-08-2015, 11:07 AM
#15
Thread Starter
Was able to work on the Bearcat this weekend. I finished the motor mount and was able to get the throttle and choke servos mounted. I still have to glass the mount and then paint.


02-08-2015, 11:13 AM
#16
Thread Starter
I'm using 10-32 bolts on all parts of the mount. It was hard trying to figure out the bolt pattern for the 300. There really isn't much information anywhere on the web. So, I thought I'd share the dimensions I used. Worked out good. Basic 5 hole pattern with the top both offset 28 degree. the pattern diameter is ~98mm. I wanted the number one cylinder to be straight on top.


02-11-2015, 02:19 PM
#18
Thread Starter
Hey Mark 1960... That Bear is going to scream with the 300. Who made that scale prop for you? I'm curious as to the diameter. Also look like we're from the same area.
02-11-2015, 06:25 PM
#19
Thread Starter
I worked on the baffles today. I cut down the stock diameter with a router from the original baffle I got from Vogelsang Aeroscale. They really did a nice job on these. supper tight fit without actually touching at any point.


02-12-2015, 08:15 AM
#21
Junior Member

Hello, Yes, it is a Seidel custom propeller. The blade chord is 80mm! It is a work of art!
No expense will be spared on this build!
No expense will be spared on this build!
Last edited by Mark1960; 02-12-2015 at 08:22 AM.
02-15-2015, 09:19 AM
#25
Junior Member
Sierra giant scale retracts modified to all electric by Down and Locked. Also, new plug I made for the
race canopy. Much sleeker than the one in the kit. Will make female mold from this.
race canopy. Much sleeker than the one in the kit. Will make female mold from this.